RESIST MAP · DYE PATH · APPROVAL RANGE
Tie-Dye for Custom Apparel
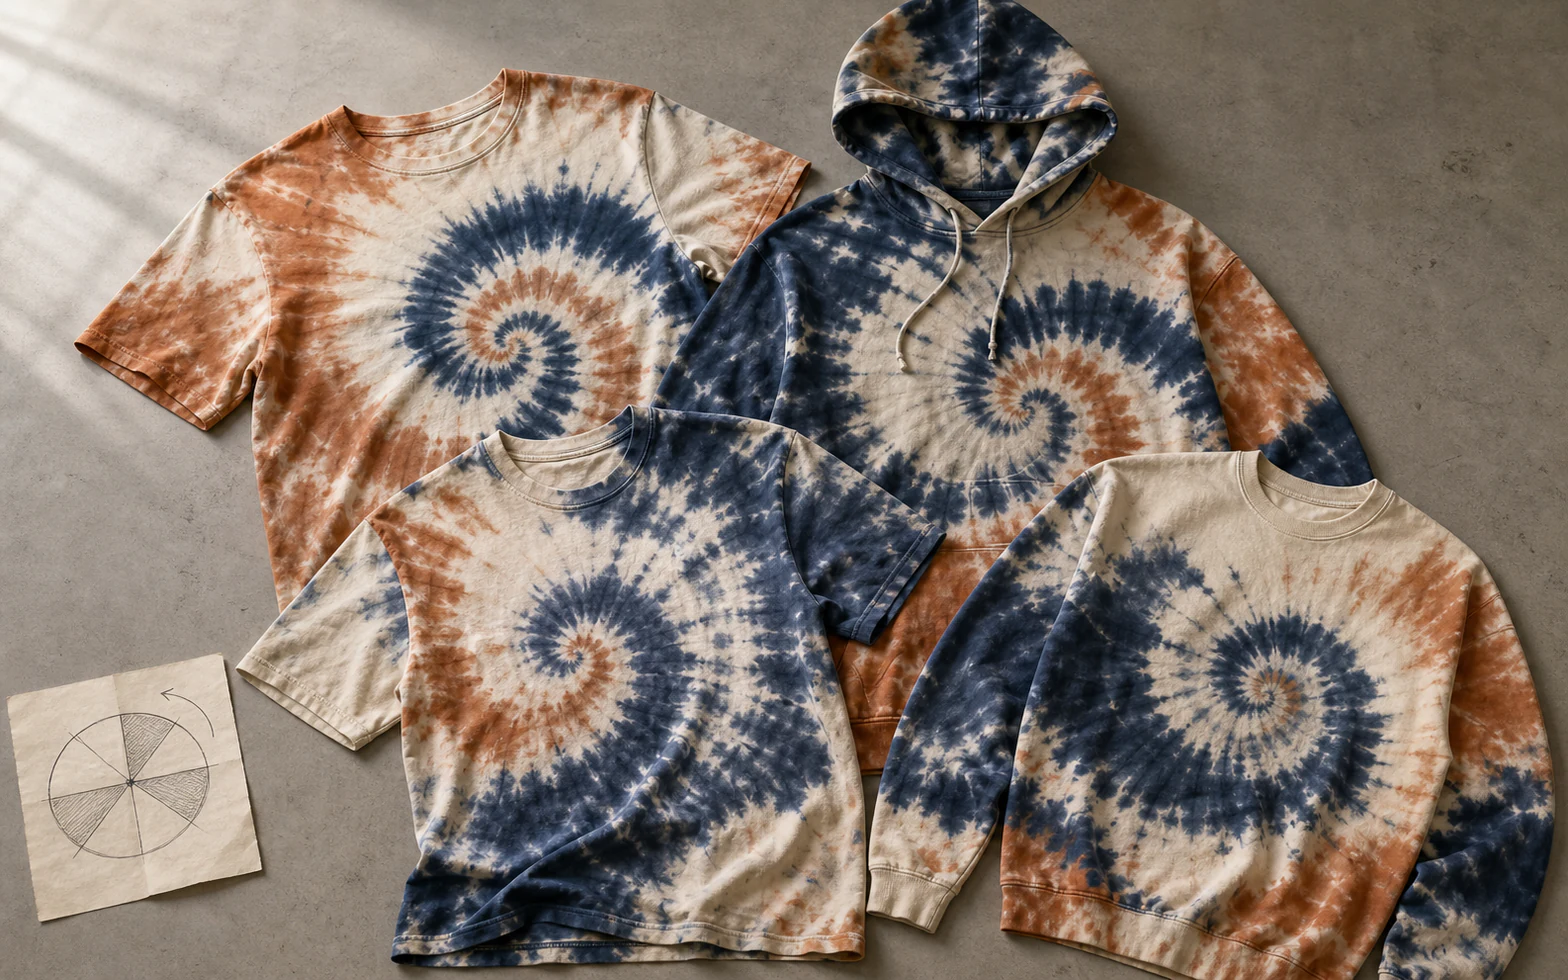
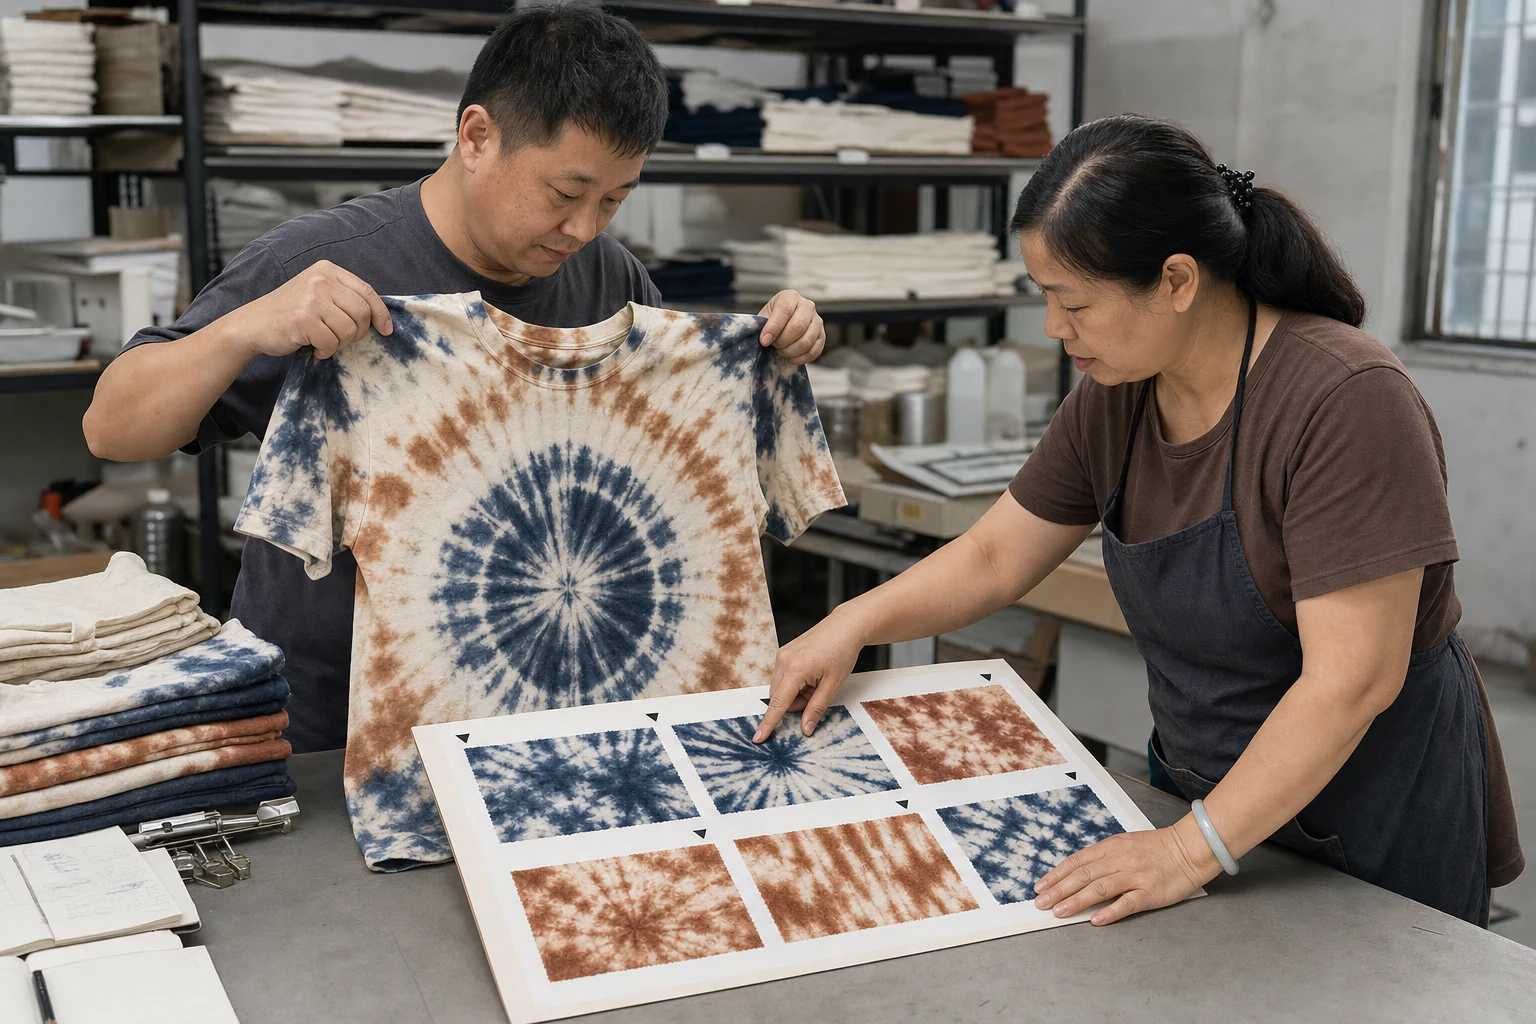
Choose tie-dye when organic resist marks and controlled piece-to-piece variation fit the collection. We confirm fibre, base colour, construction and a signed visual range before bulk.
- Shape
- Fold, bind, stitch or clamp
- Route
- Fibre, base and dye system
- Release
- Signed target and variation range
PROJECT FIT
Start with the project, not the pattern name.
Tie-Dye fits organic resist marks and a controlled family of related pieces.
Hold the route when fibre, base colour, finish, construction, trims or the permitted variation remain unknown.
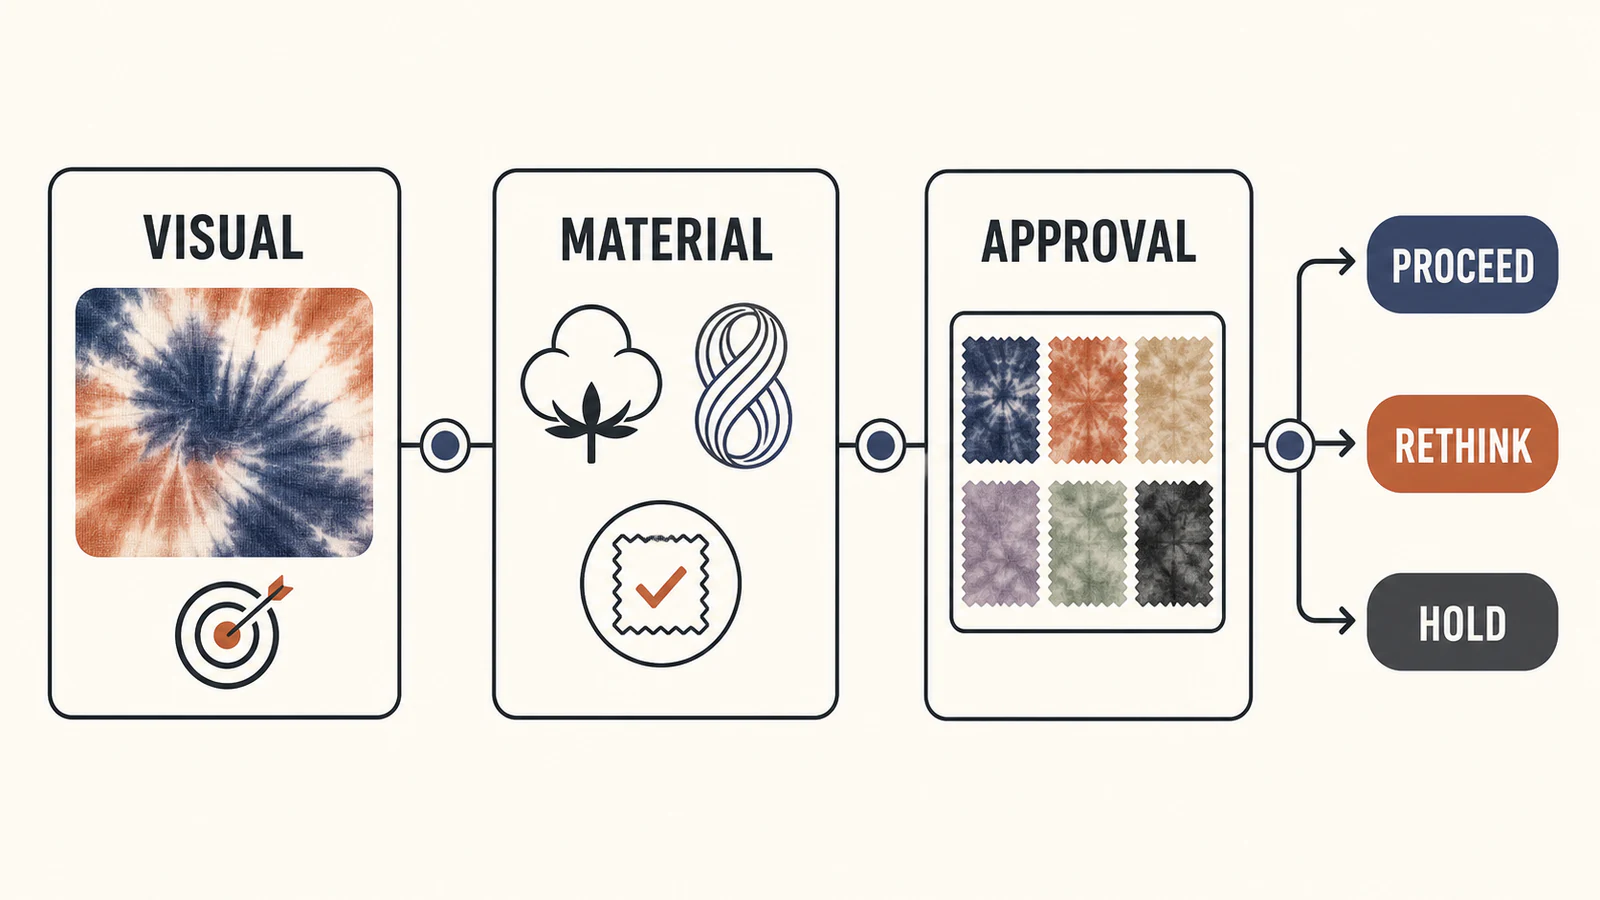
Visual
Proceed with organic resist marks and controlled asymmetry; rethink fine text, exact logos, photographs or identical placement.
Material
Proceed with known fibre, base, finish, construction and trims; hold unknown blends, coatings, elastane or components.
Approval
Proceed with a signed target and range; hold a single reference image that does not define permitted variation.
Best for
- Organic spiral, ring, pleat, cloud, stripe or stitch-resist effects where controlled variation is part of the design.
- Confirmed fibre and base-colour combinations with a compatible dye, fixation and wash-off route.
- Collections that can approve a motif family and visual range instead of requiring cloned pieces.
Hold when
- Fine text, a precise logo, photographic detail or identical placement is required on every piece.
- A dark base needs a bright pale result without a separately tested removal route.
- Unknown finishes, mixed fibres, trims or heat-sensitive construction have not been checked.
- The buyer cannot define what may vary and what must remain fixed.
Approve by
- Actual-material strike-off and fold-map trial.
- Complete-style sample with all thread, rib, elastic, labels and hardware.
- A signed range board covering colour, motif scale, origin, coverage and light-space limits.
- Agreed laundering, rubbing, perspiration, dimensional or pH tests where the end use requires them.
RESIST GEOMETRY
One effect family. Six ways to shape the resist.
The method name is less useful than the actual origin, fold width, direction, spacing, pressure and colour order.
Use neutral production names unless a culturally specific historical technique is intentionally and accurately specified.
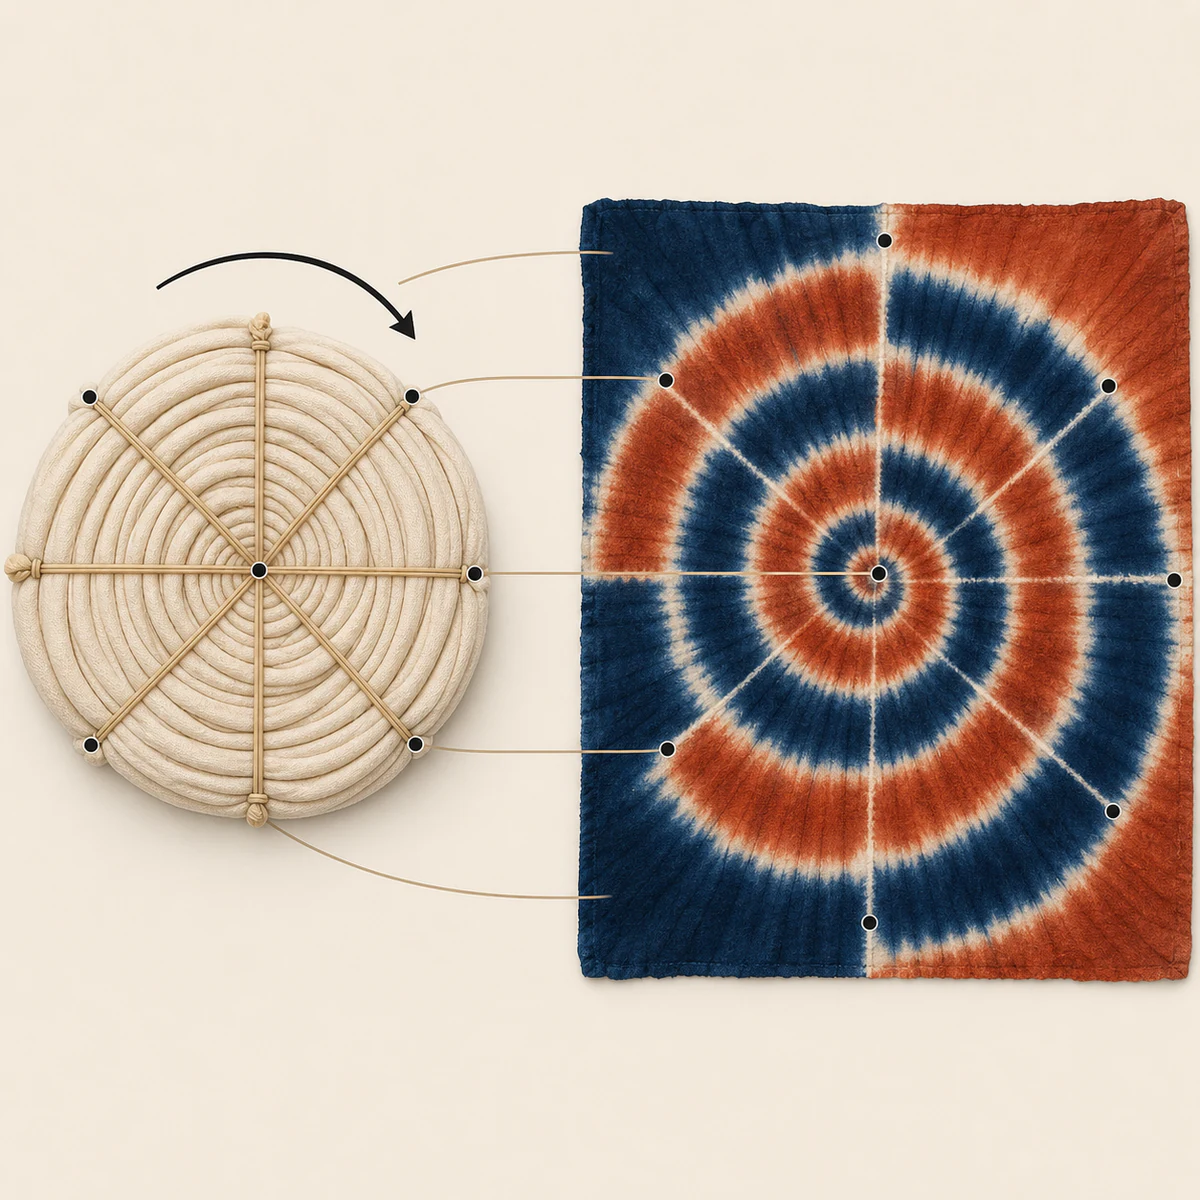
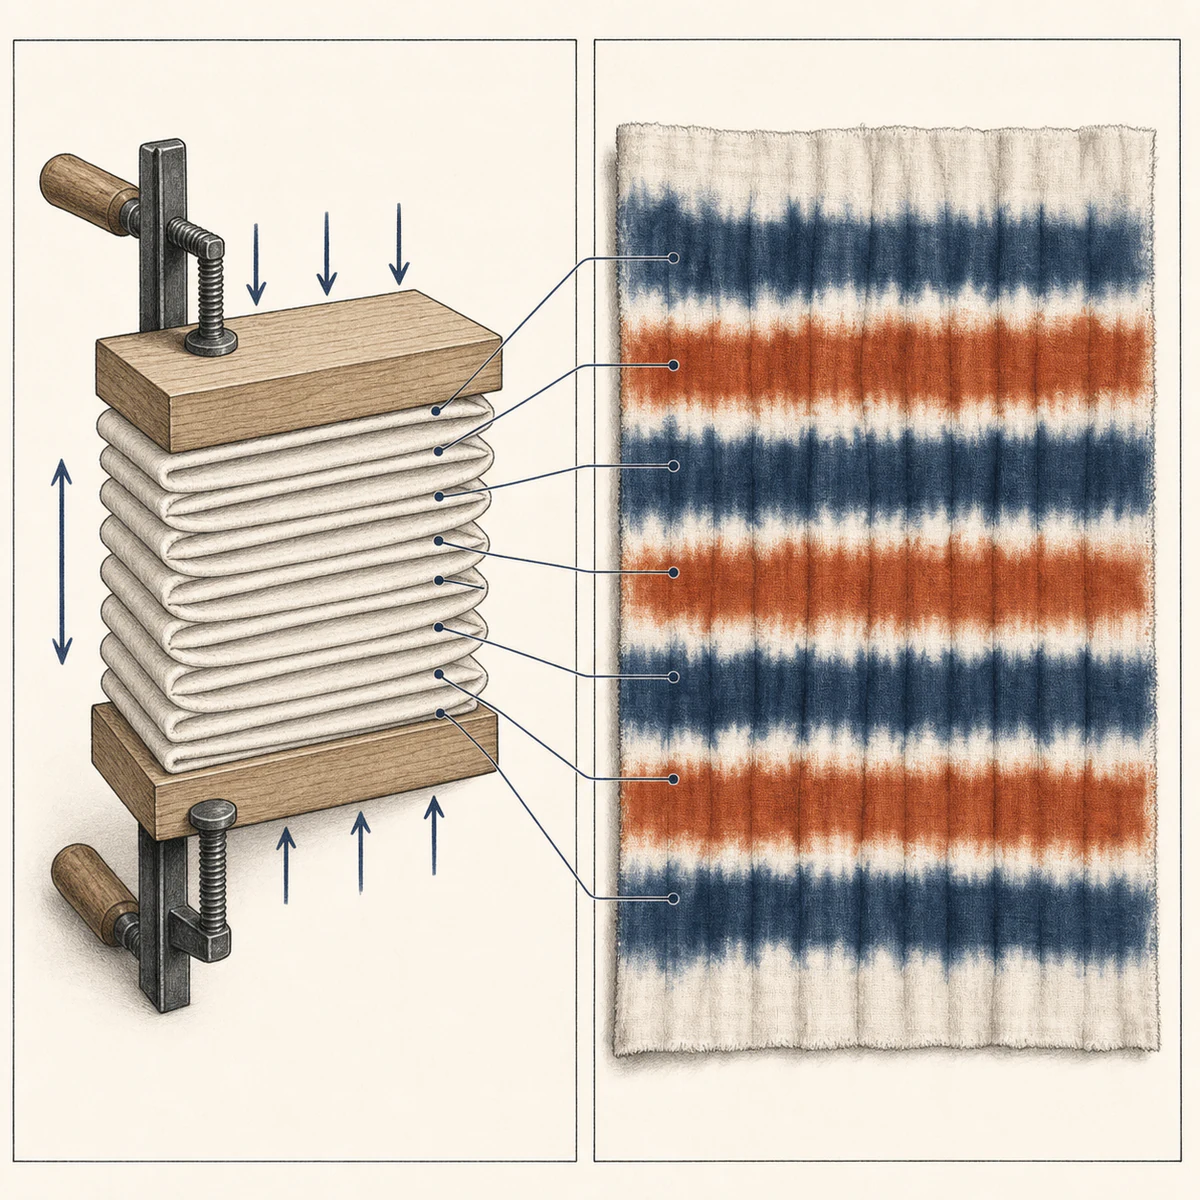
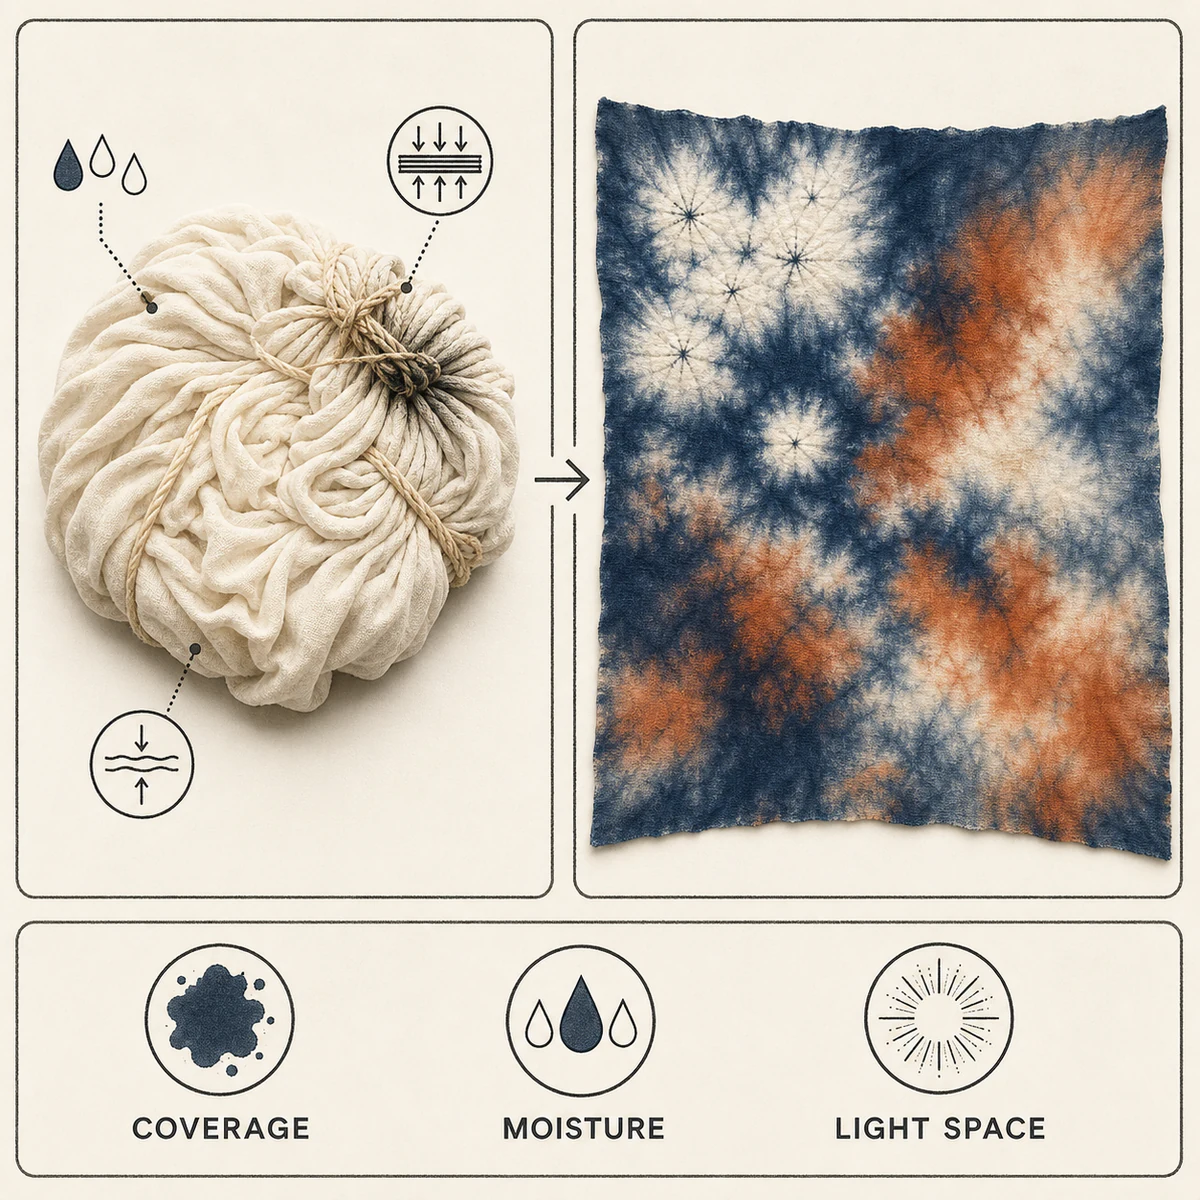
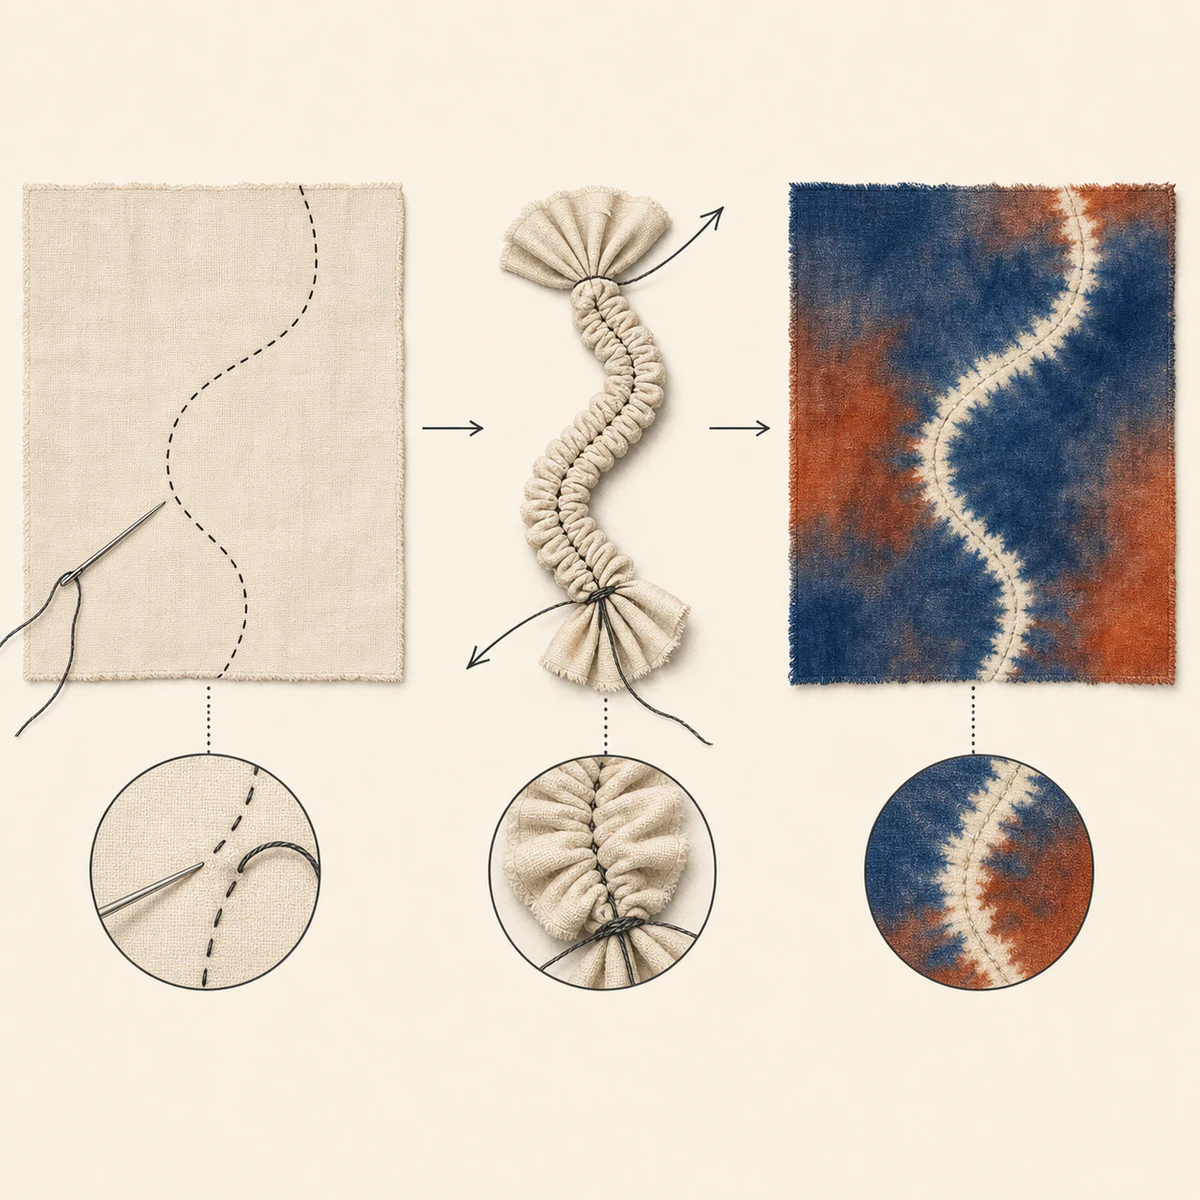
Spiral / Twist
Lock the origin zone, twist direction, coil size, tie map and colour order; allow limited feathering and penetration shifts.
Bullseye / Rings
Lock pull points, cone height, tie spacing and ring count; approve a range for ring width and local symmetry.
Accordion / Pleat
Lock fold width, direction, alignment and clamp pressure; approve the permitted band-edge softness.
Scrunch / Cloud
Lock gather density, moisture, coverage and application face; approve cloud boundaries and local light space.
Stitch / Pull
Lock the stitch map, stitch length and pull tension; approve limited line breaks and diffusion.
Clamp / Block / Wrap
Lock fold map, block shape, overlap and pressure; approve the permitted geometric edge diffusion.
FIBRE ROUTE
The fold shapes the mark. The fibre chooses the dye system.
Tie-Dye is not one dye recipe. The actual fibre, blend, finish and heat response determine the development route.
Stop and identify unknown composition or finish before choosing chemistry.
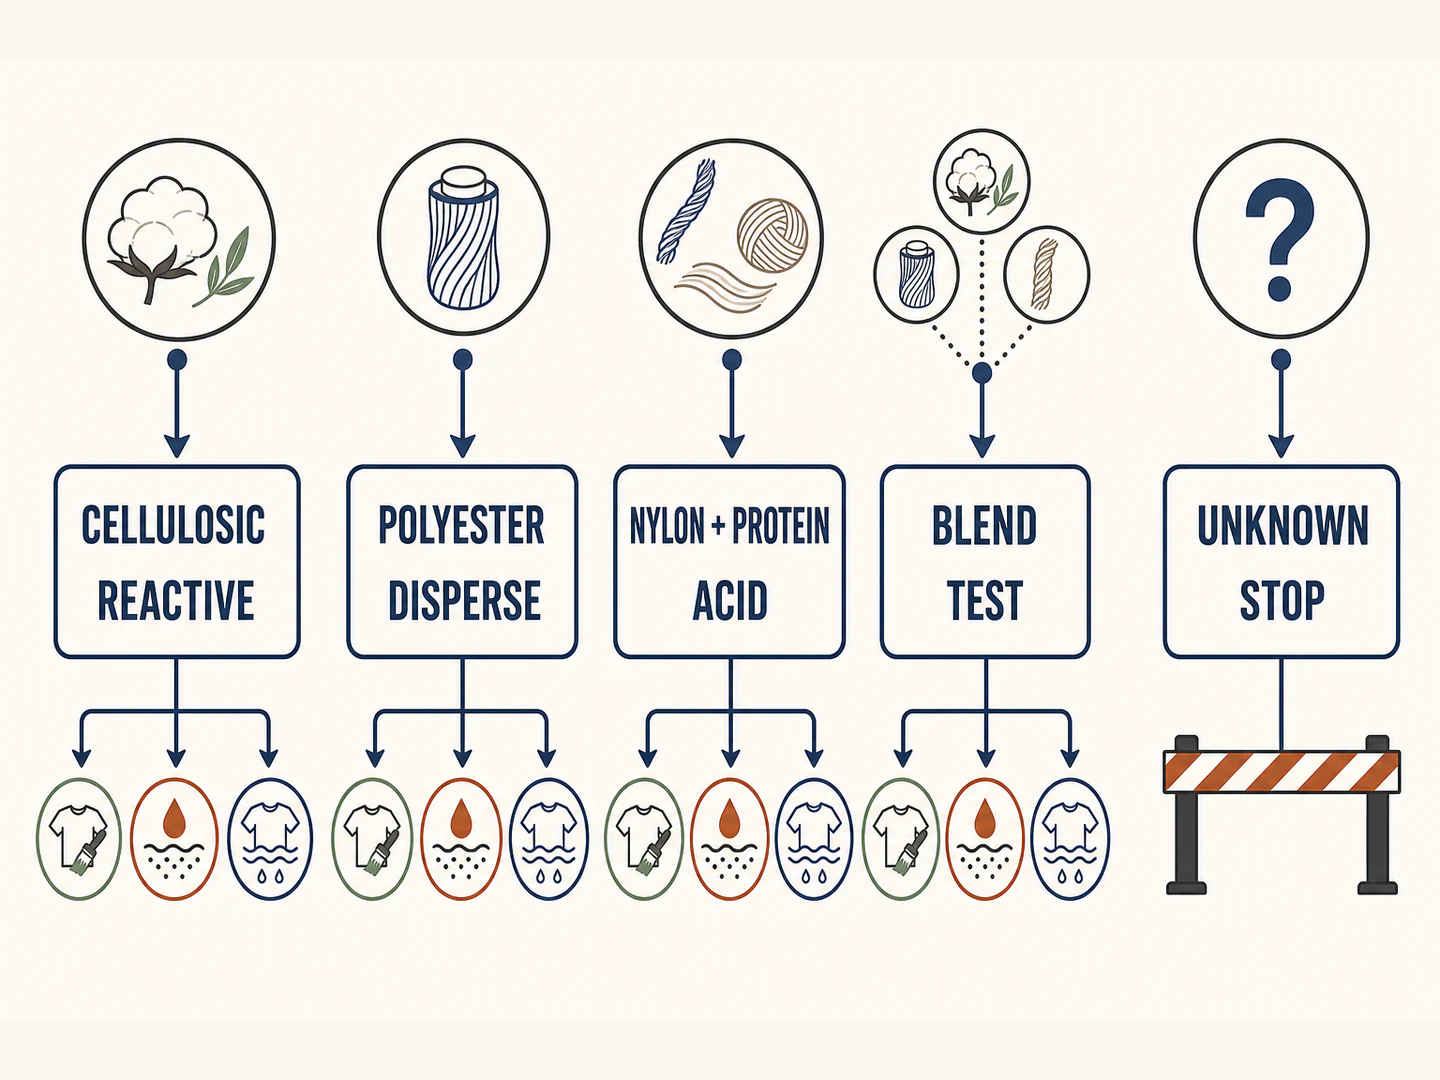
Cotton / Linen / Viscose / Lyocell
Review a cellulosic reactive route together with composition, preparation, finish, construction and fastness target.
Polyester
Use a polyester-compatible disperse and heat route; check elastane, trims, hardware and complete-style heat response.
Nylon / Wool / Silk
Use a fibre-appropriate route and confirm pH, heat, agitation, handfeel and care sensitivity.
Blend
Confirm percentages and yarn structure, then approve intentional component contrast or reject unwanted differential uptake.
Unknown
Identify the production fibre and finish before selecting dye chemistry or promising a result.
BASE COLOUR
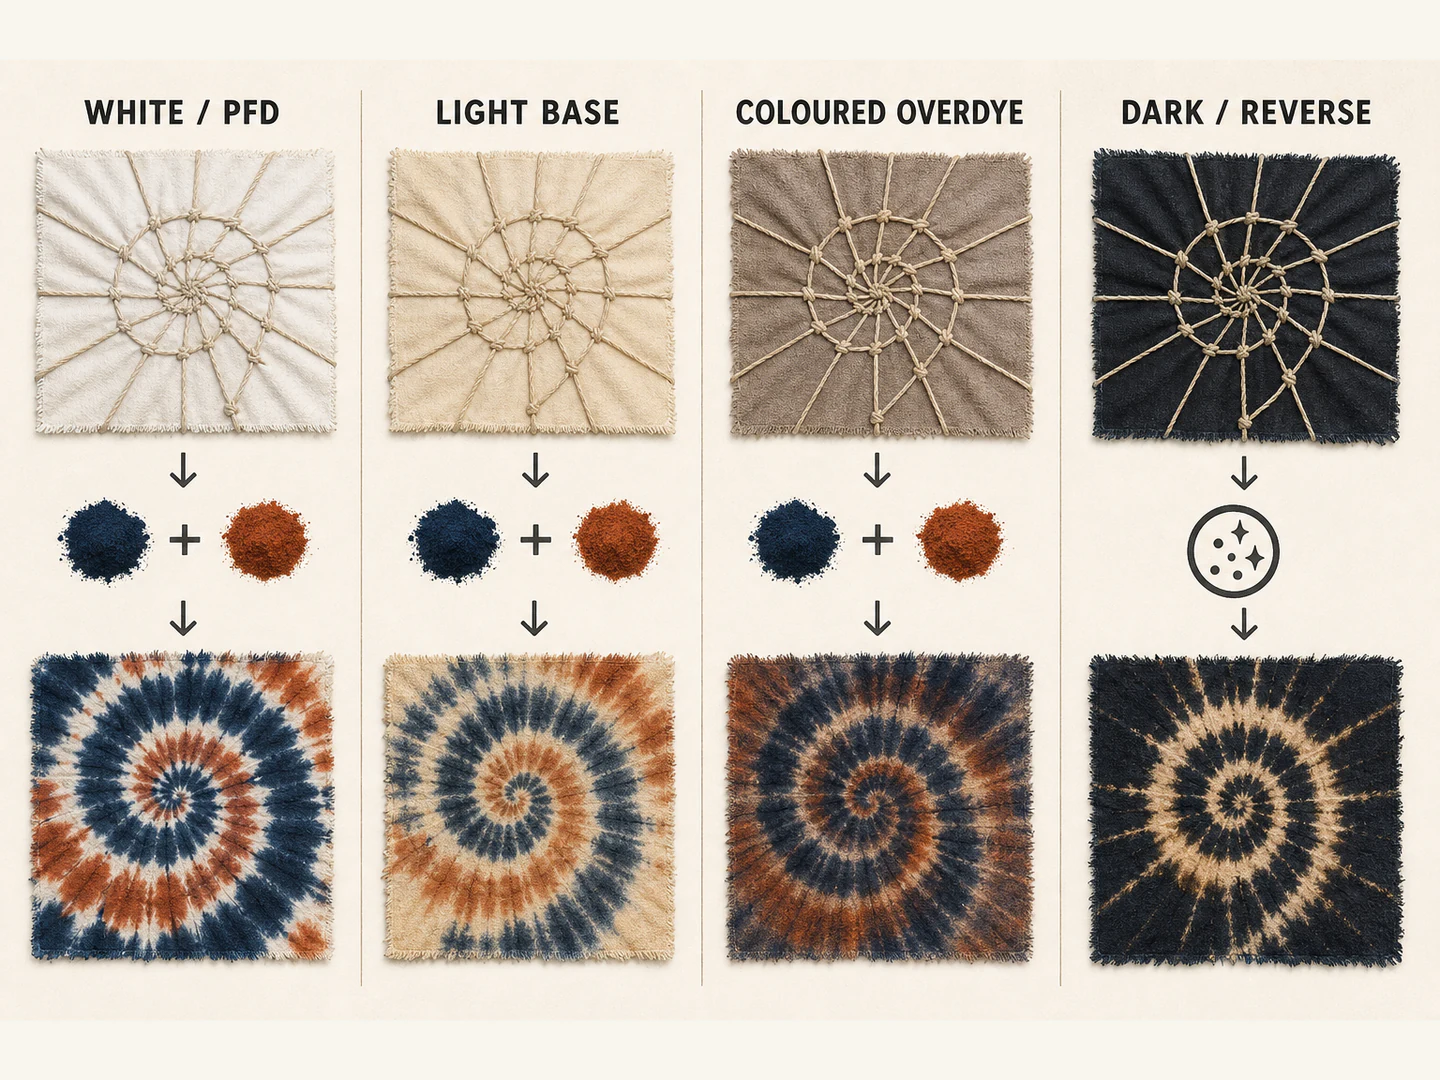
The base colour stays inside the result.
A dye is not an opaque ink. The starting shade remains part of the colour equation.
Reverse Tie-Dye is a separate development route because existing colourants do not all remove evenly or completely.
White / PFD
Review base whiteness, preparation, absorbency and optical brightener before approving additive colour.
Light Colour
Approve the combined shade, contrast and staining behaviour created by the existing and added colours.
Coloured Overdye
Sample every base and added-dye combination separately instead of assuming the same result.
Dark / Reverse
Test removal response, undertone, fibre and trim condition, pH, wash route and any optional recolouring.
PRODUCTION STAGE
Build the motif before sewing—or around the finished garment?
Panel-first work gives flatter access but requires placement and seam planning after cutting.
Garment-stage work relates the motif to the complete silhouette but exposes every seam, pocket, rib, thread, trim and closure to wet processing.
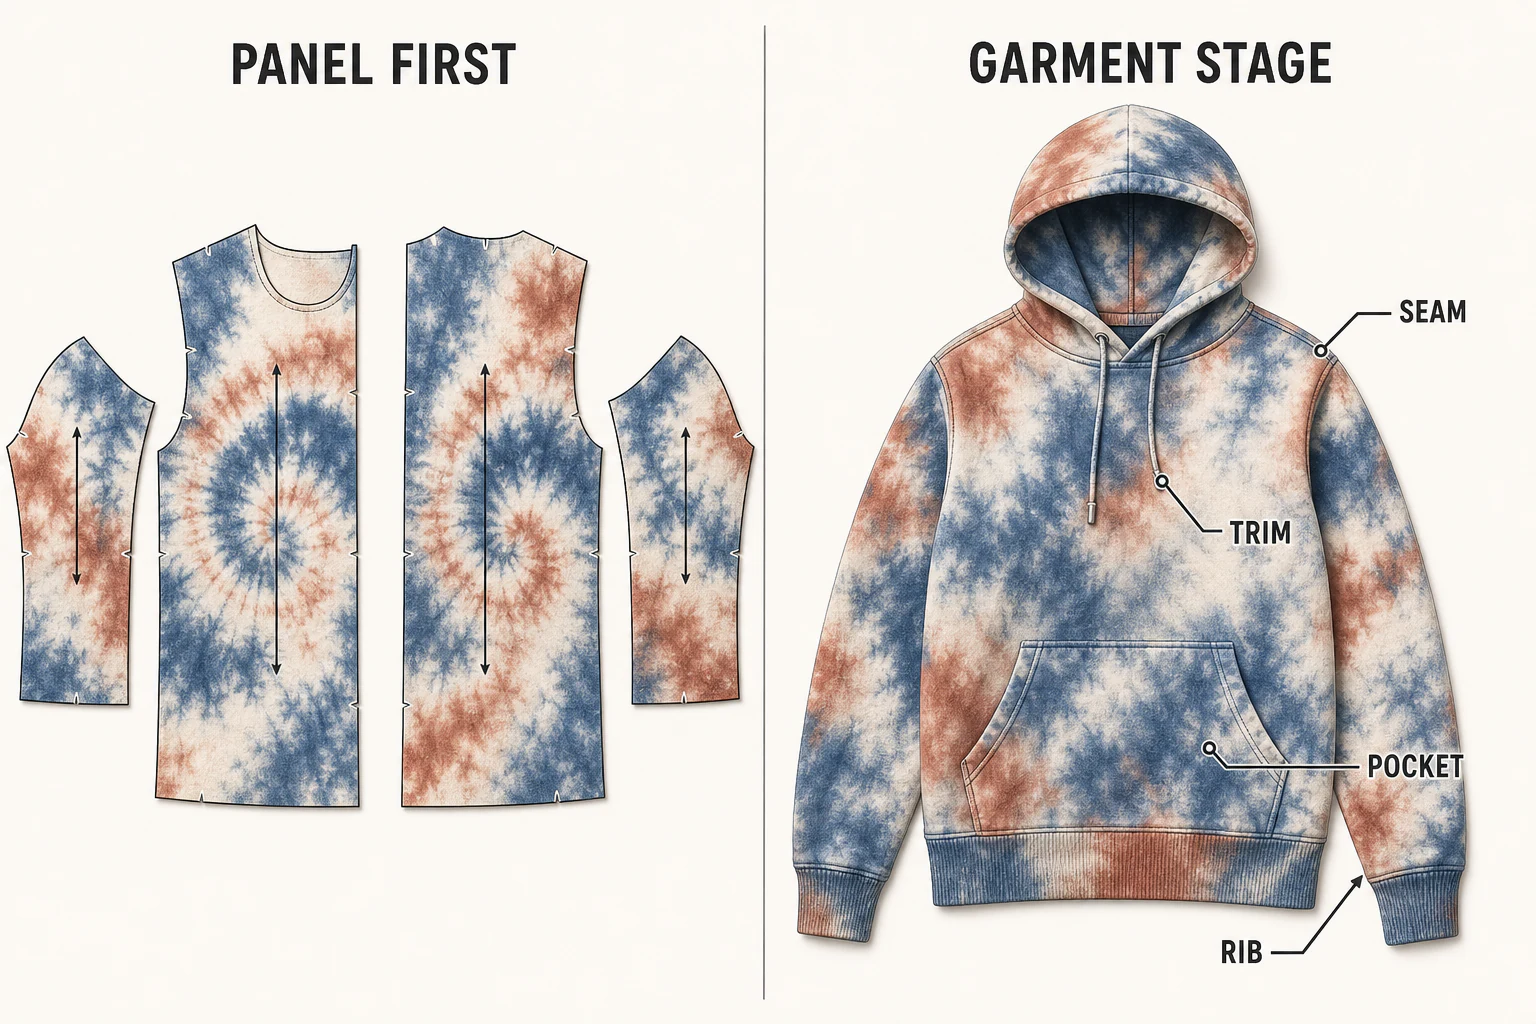
Fabric / Panel First
Choose flatter pleat, clamp, yardage or planned-panel access while controlling cut placement, seam continuity and later-added components.
Garment After Sewing
Choose complete-silhouette placement only after checking compression, uptake, dimensions and appearance around all constructed zones.
DYE PATH
A real process starts before the garment is tied.
Define the visual and confirm the substrate before selecting chemistry or shaping the resist.
Reactive, disperse and acid-dye systems do not share one public temperature, pH or fixation recipe.
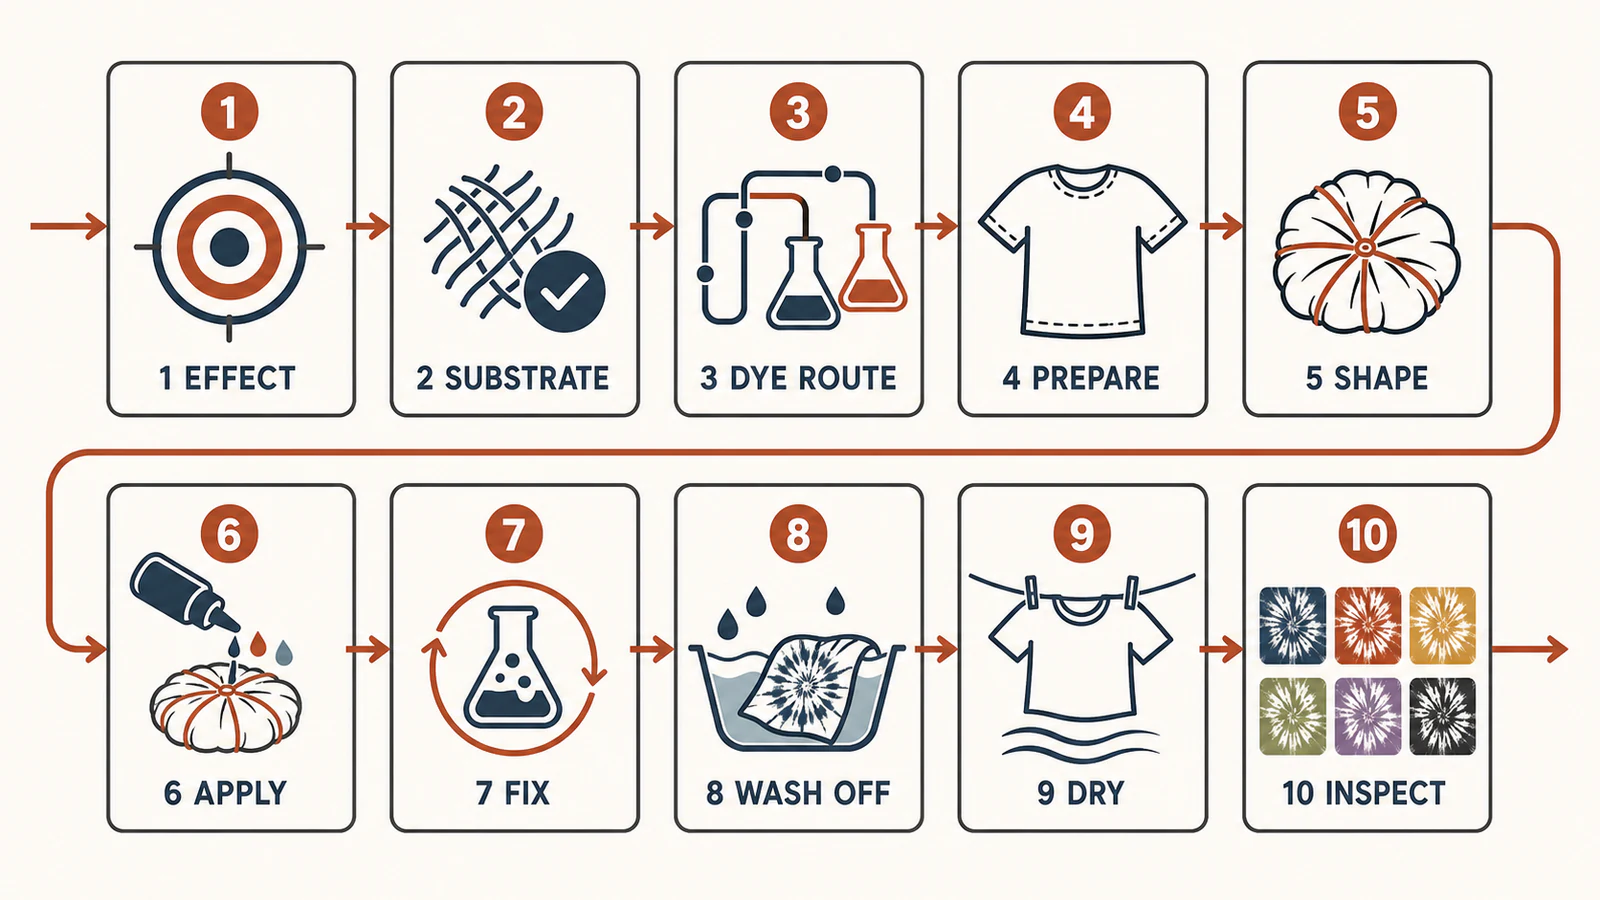
- 01
1. Define the Effect
Lock motif family, origin, direction, colours, coverage and light-space range.
- 02
2. Confirm the Substrate
Confirm fibre, construction, weight, stretch, finish, base and complete trim list.
- 03
3. Select the Dye Route
Choose chemistry from the actual fibre and required end use.
- 04
4. Prepare and Check Uptake
Clean, wet and verify the base and absorbency before colour application.
- 05
5. Mark and Shape
Fold, twist, stitch, bind or clamp and record the resist map.
- 06
6. Apply Colour
Use the approved immersion, controlled application, staged or reverse route.
- 07
7. Fix for the Chemistry
Use the selected system's actual process rather than one public universal recipe.
- 08
8. Rinse, Wash Off and Open
Remove unfixed colour and reveal the resist according to the approved route.
- 09
9. Dry and Finish
Check handfeel, dimensions, skew, torque, elastic and trims.
- 10
10. Inspect the Range
Release only the approved visual zones, defects, tests and bulk range.
RANGE APPROVAL
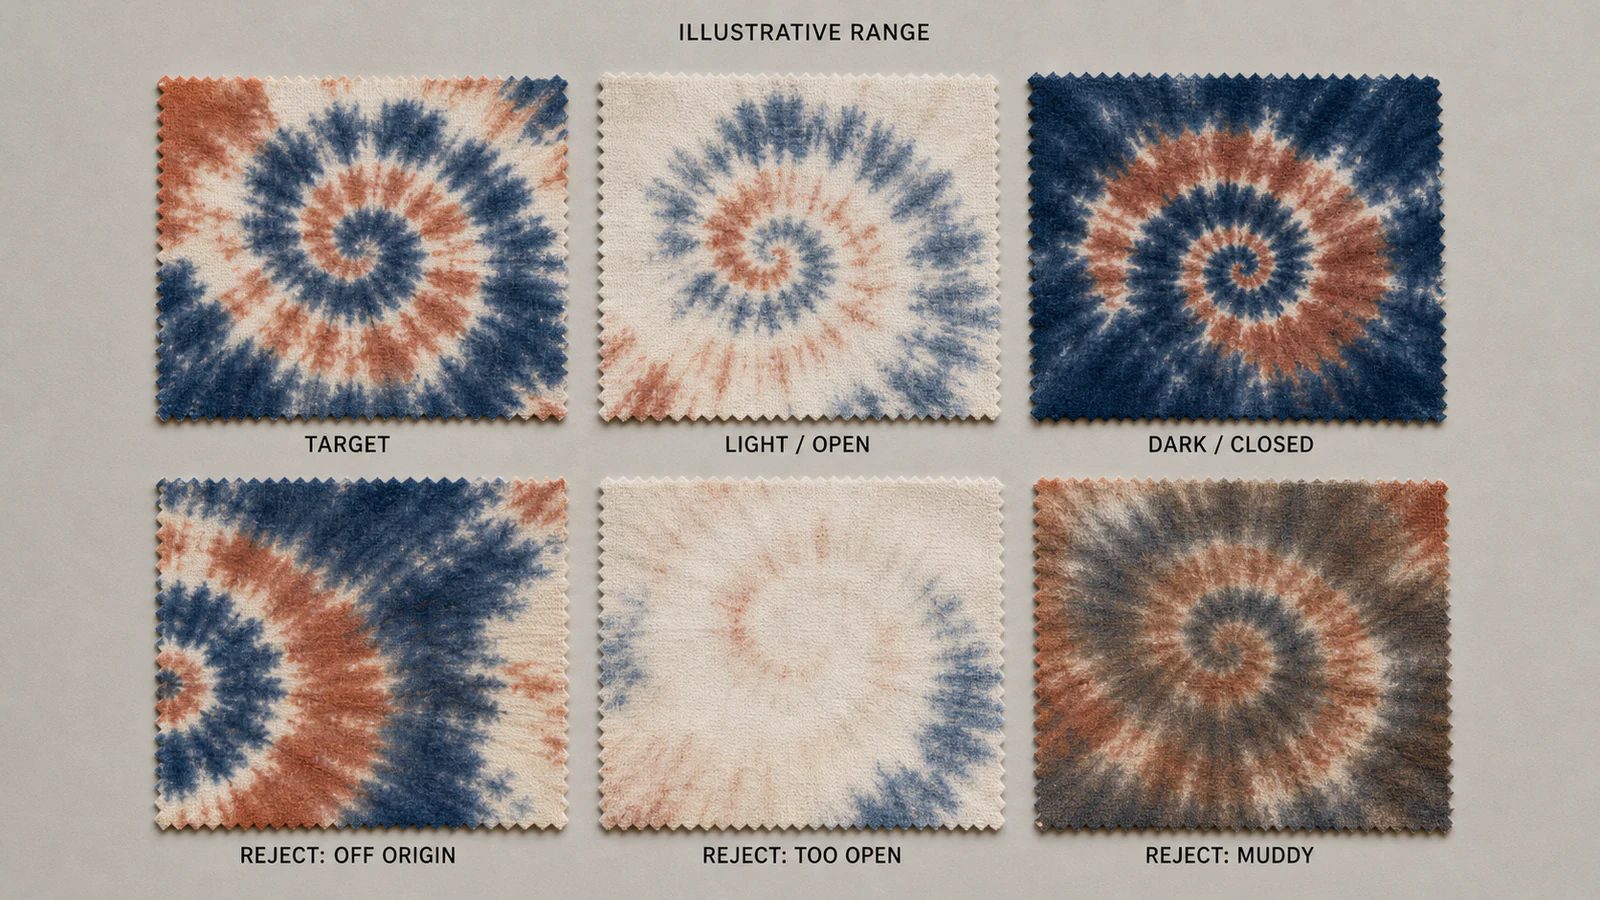
Repeat the design language—not every dye edge.
One golden sample cannot describe a variation-led bulk order.
Instrumental colour can support colour decisions but cannot judge motif origin, direction or light-space placement.
Colour controls
Approve shade family, light/dark range, unwanted overlap, staining, transfer and after-wash change.
Geometry controls
Approve origin, direction, scale, coverage, light space, critical garment zones and reject outliers.
Lock
Record fold family, origin, direction, fold width, tie spacing, moisture state, colour order, substrate lot and process identity.
Permit inside the range
Allow bounded feathering, penetration shifts and small ring, arm or cloud-boundary changes.
MATERIAL AND GARMENT
The dye sees every fibre, seam and finish.
Compatibility depends on the actual fibre, base colour, stretch, structure, finish, pattern, quantity, heat, wash route and approved sample.
Hold development when the material history, complete component list or representative care route is unknown.
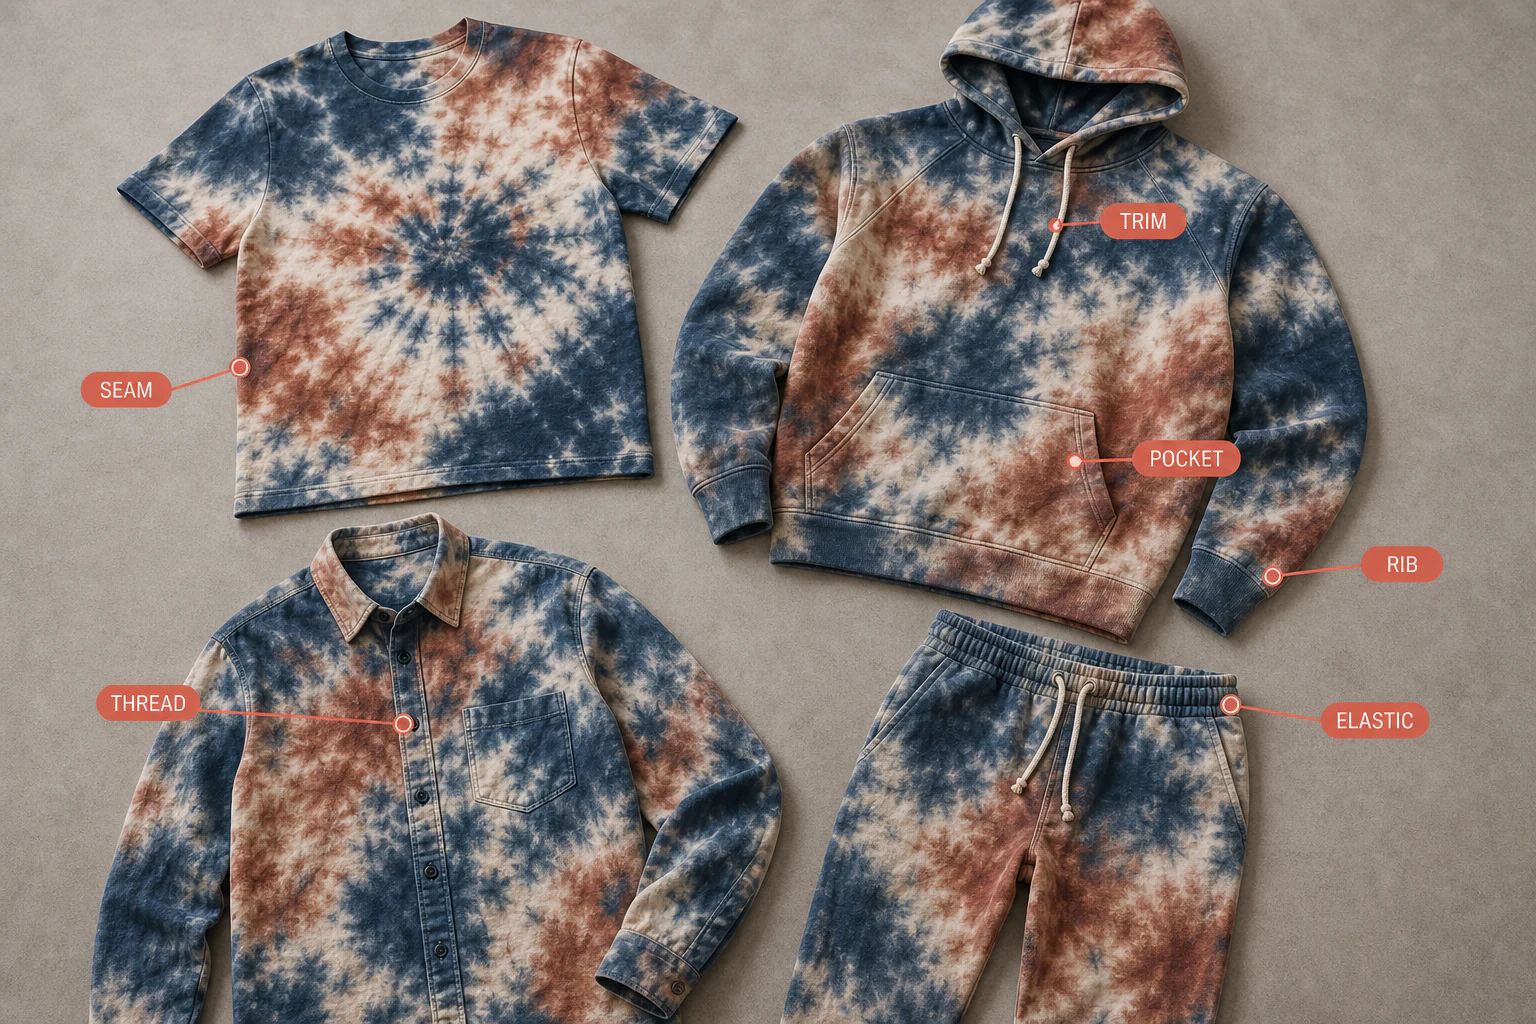
Material gate
Confirm fibre percentages, base, finish, elastane, structure, complete component BOM and representative wash/dry route.
T-Shirts
Check jersey, neck rib, side seams, thread, shrinkage and torque for spiral, ring, scrunch or pleat effects.
Hoodies
Check fleece uptake, hood, pocket, rib, drawcord, zipper and drying around large cloud or spiral effects.
Shirts
Check collar, cuff, placket, buttons, interlining and seam geometry for directional or panel effects.
Pants and Joggers
Check waistbands, pockets, elastic, cuffs, leg direction, size scaling, symmetry and skew.
Shorts
Check waistband, liner, pockets and drawcord before approving a localised or all-over route.
Dresses
Check silhouette, lining, zipper, length change and motif balance for long pleats, panels or all-over effects.
SAMPLE AND QC
Approve the route in layers.
Move from actual-material strike-off to fold map, complete style, range set, selected sizes and first-off.
A method name is not a pass grade; agree the version, specimen, conditioning, procedure, limit, sampling plan, laboratory and decision owner.
Material Strike-Off
Confirm actual material, base, colour route and fibre/dye compatibility.
Fold-Map Trial
Compare resist geometries on the same material and select the motif family and control levers.
Complete-Style Sample
Review the real garment with seams, rib, thread, trims and closures.
Range Set
Sign the target, permitted visual edges and reject examples.
Size Confirmation
Confirm motif scale and origin logic on selected sizes or size-specific fold maps.
First-Off
Release or correct production using the actual lot and process record.
MOQ
Our usual MOQ is 100 pieces per style per colour. Material or a specific style may require a different minimum.
FAILURE MODES
Open the resist. Read the failure.
A generated diagram can explain a defect but cannot prove a physical sample passed.
Dark-base discharge halo, yellowing or fibre damage requires a separate trial on the actual base and components.
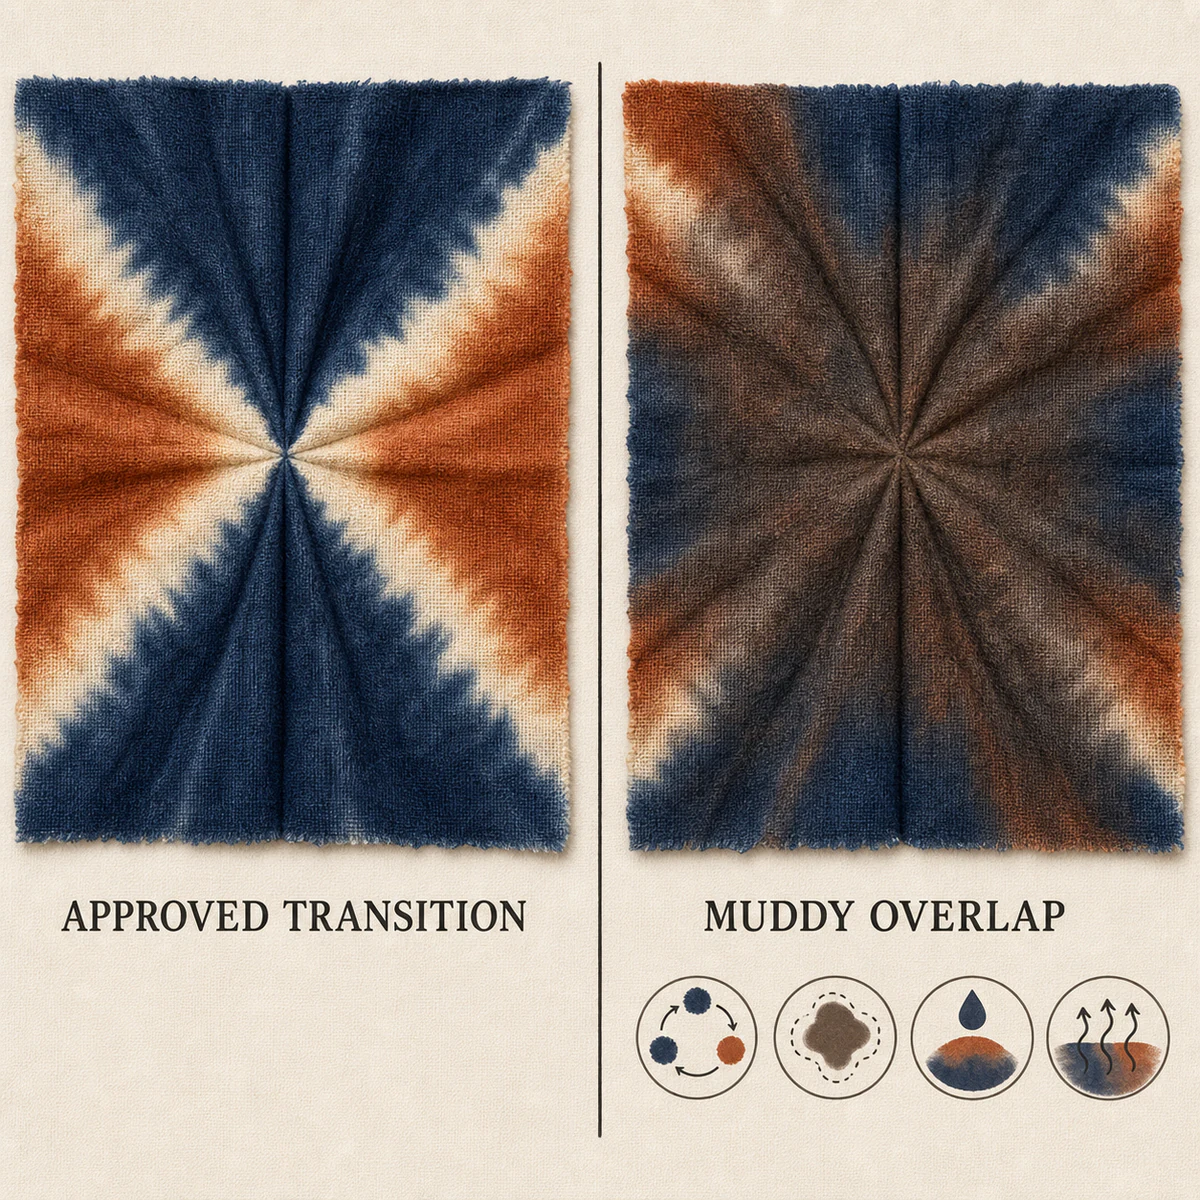
Muddy Overlap
Check colour sequence, overlap, volume and migration; define which overlaps are intentional.
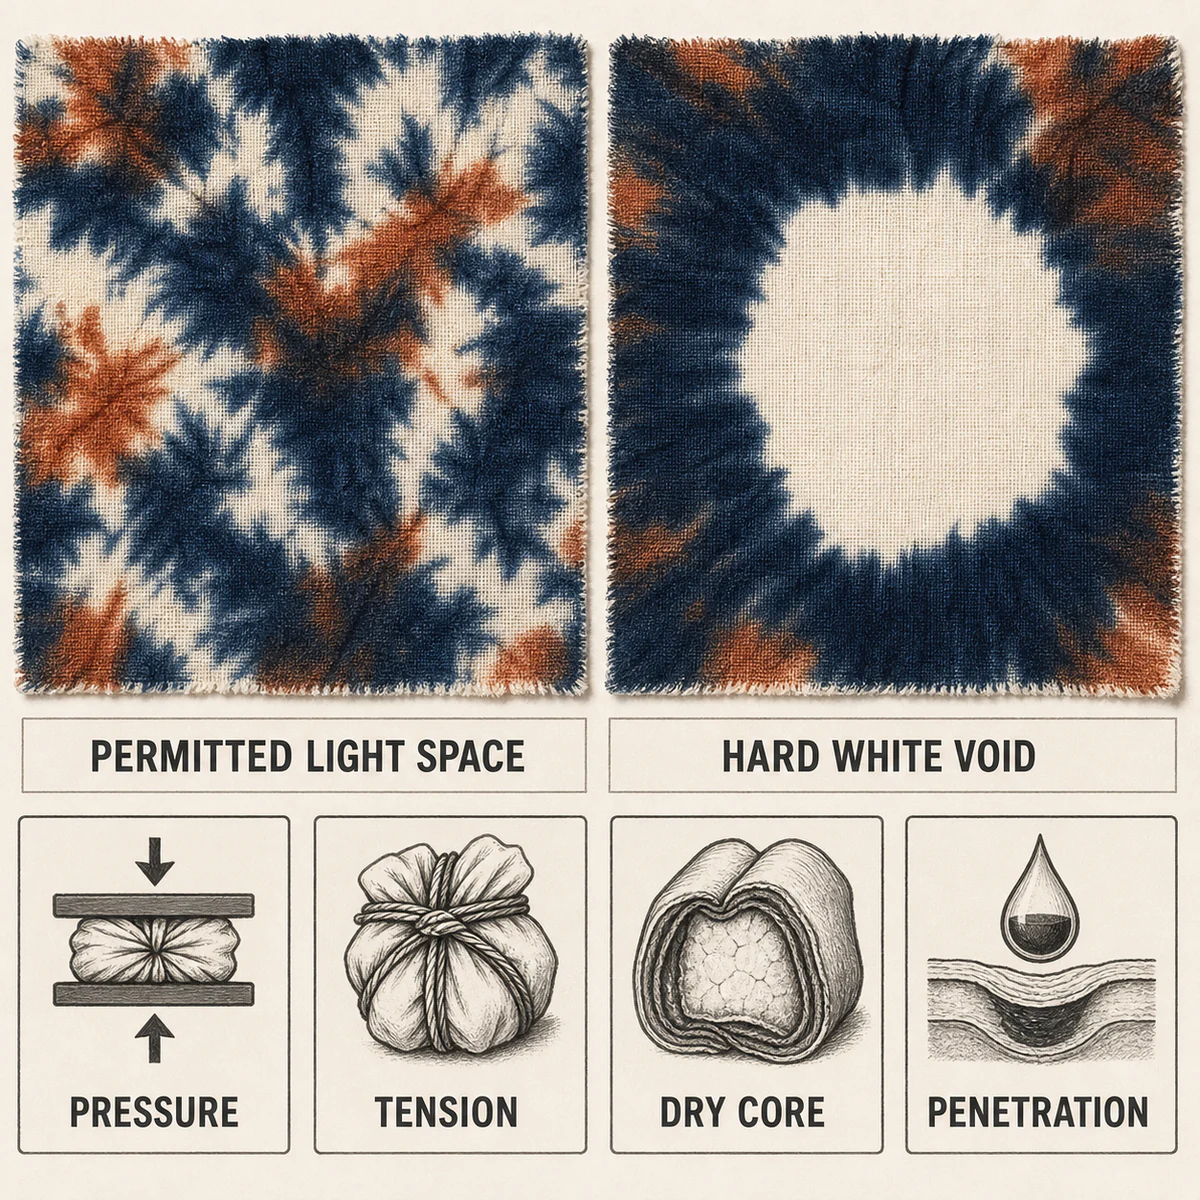
Hard White Void
Check compression, tie tension, dry inner layers and penetration; sign the permitted light-space band.
Resist Collapse
Check securing, penetration and movement; define the minimum contrast for the motif family.
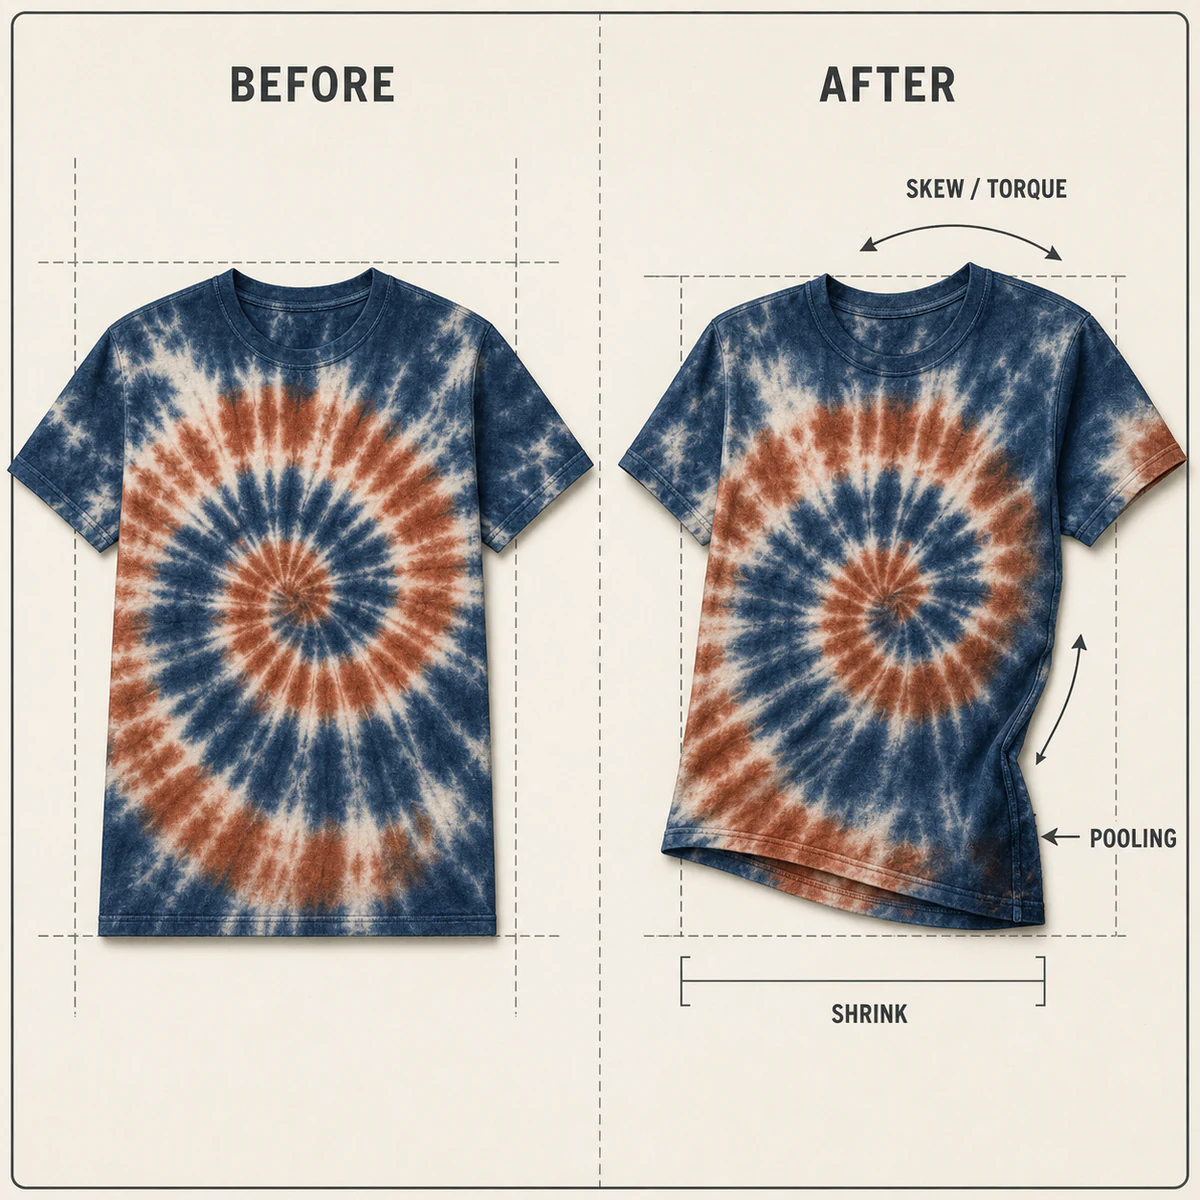
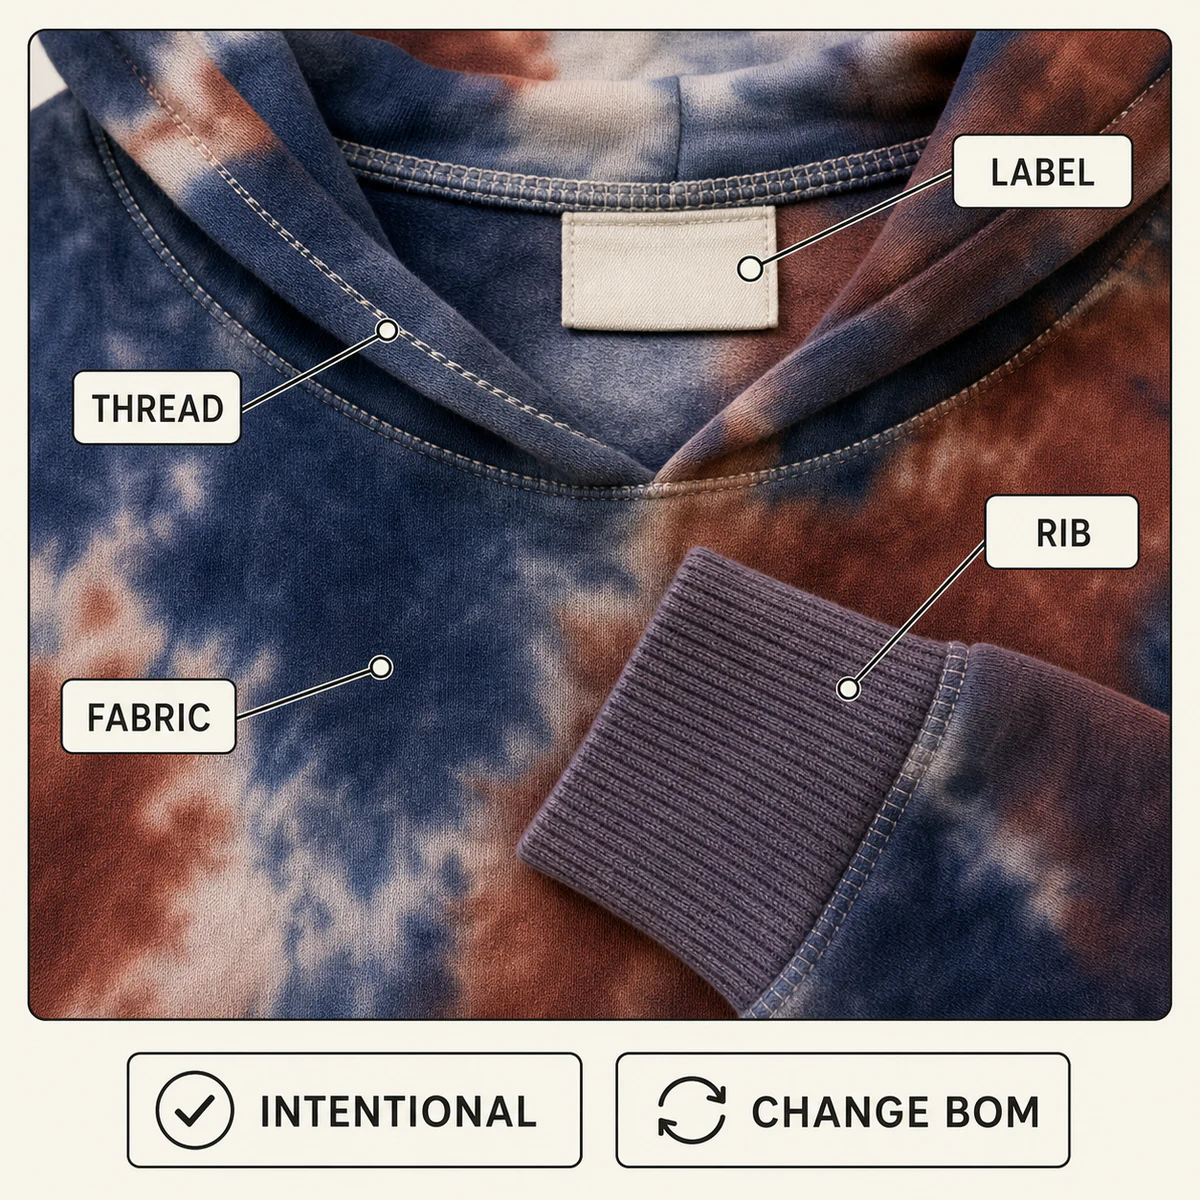
Thread / Trim Mismatch
Decide whether component contrast is intentional or whether the BOM and dye route must change.
Seam / Pocket Pooling
Identify critical complete-style zones affected by multilayer compression, trapped liquor or differential uptake.
Shrink / Skew / Stretch Loss
Agree before-and-after measurements, recovery limits and the representative care route.
METHOD COMPARISON
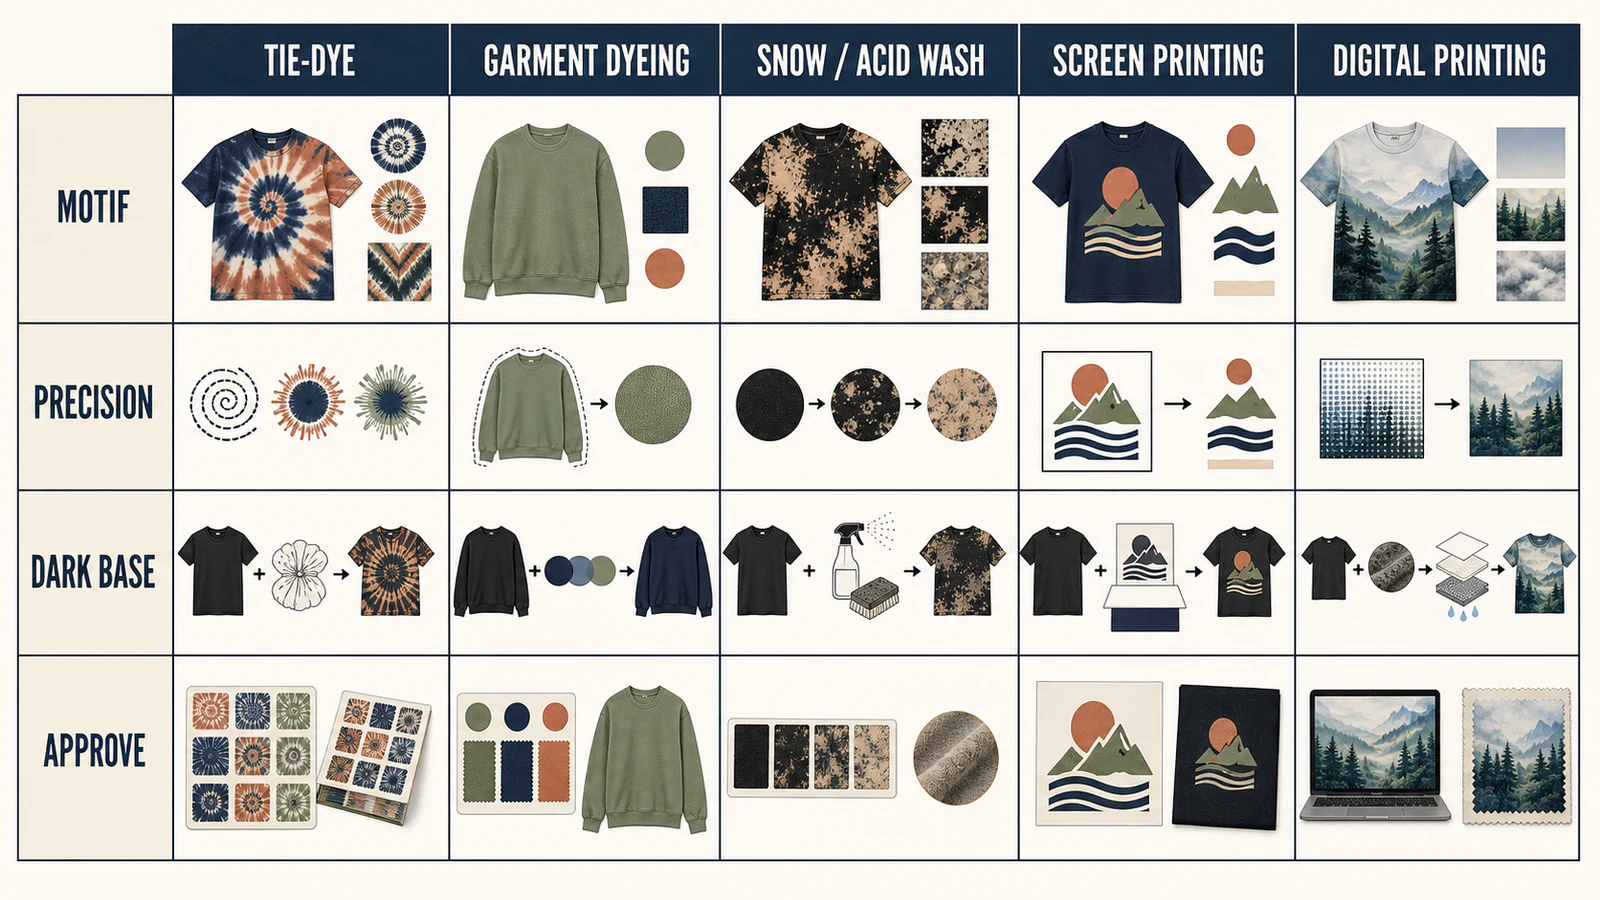
Choose by the visual target—not by the trend name.
Choose Tie-Dye for shaped resist and a signed family of variation.
Choose another route when complete-garment colour, colour removal or exact registered artwork is the real requirement.
Tie-Dye
Use shaped resist and approve a motif family, colour range and natural variation window.
Garment Dyeing
Use when complete-garment colour matters more than a tied motif.
Snow / Acid Wash
Use when colour removal, abrasion or a worn effect is the primary target.
Screen Printing
Use when exact logos, text or registered spot graphics are required.
Digital Printing
Use a compatible digital system when fine detail, gradients or repeatable image data are required.
BUYER FAQ
Questions to close before a Tie-Dye sample.
These answers define the project boundary without replacing a physical sample or agreed specification.
FAQ structured data may include only these visible questions and answers.
01Can every Tie-Dye piece look exactly the same?+
Approve a motif family, origin, scale, coverage and colour range. Small feathering and penetration changes remain natural.
02What is the best fabric for custom Tie-Dye?+
There is no universal best fabric. Fibre chemistry, finish, base colour, construction and the actual sample decide the route.
03Can polyester be Tie-Dyed?+
Yes, with a polyester-compatible disperse-dye and heat route after checking elastane, trims, hardware and complete-style response.
04Can you make a bright pale Tie-Dye on a black garment?+
A tested reverse or discharge route may remove colour first, but the existing dye, fibre, trims and strength must be checked.
05Should Tie-Dye happen before or after sewing?+
Choose after reviewing motif placement, seams, pockets, rib, thread, trims and the care route.
06Will the sewing thread and trims match the fabric?+
Not automatically. Every thread, rib, label, elastic, button, zipper and drawcord needs a component decision.
07Can Tie-Dye reproduce a logo or precise graphic?+
Use Tie-Dye for shaped-resist marks; compare screen or digital printing for fine text, exact edges or registered images.
08How do you check colourfastness?+
Agree the exact laundering, rubbing and relevant perspiration methods and pass grades before production.
09What is the MOQ for custom Tie-Dye apparel?+
Our usual MOQ is 100 pieces per style per colour. Material or a specific style may require a different minimum.
10Is Tie-Dye automatically sustainable?+
No. Check the actual dye selection, fixation, wash-off, water, energy, wastewater, facility and supporting evidence.
11What do you need for a Tie-Dye quote?+
Send style, quantity, actual fabric and base, complete trims, motif reference, colours, coverage, permitted variation, care route and test requirements.
PROJECT BRIEF
Define the resist, the material and the range.
Use the actual order material and complete component list rather than a generic fabric name.
Canton Fashion will review the material, base colour, construction, motif and sample route before confirming feasibility.
Product and order
Product type, quantity, sizes, colour split, deadline, target market and buyer contact.
Material and construction
Composition, construction, weight, stretch, base, preparation, complete trims and thread.
Motif definition
Motif family, reference, colour sequence, origin, direction, coverage and processing stage.
Approval definition
What may vary, what must stay fixed, care route and required wash, rub, perspiration, dimension or pH tests.
Submission boundary
The form does not promise an instant quote, unconfirmed price, lead time, colour, test grade or new submission endpoint.