Elastic Print Systems
Silicone & Rubber Printing
Choose the material and route before approving stretch, height or wash performance. Direct silicone, rubber paste, screen-print heat transfers and raised-silicone emblems require different specifications.
- Start with
- Exact fabric and surface target
- Separate
- Material, build and application route
- Approve
- Production-fabric strike-off
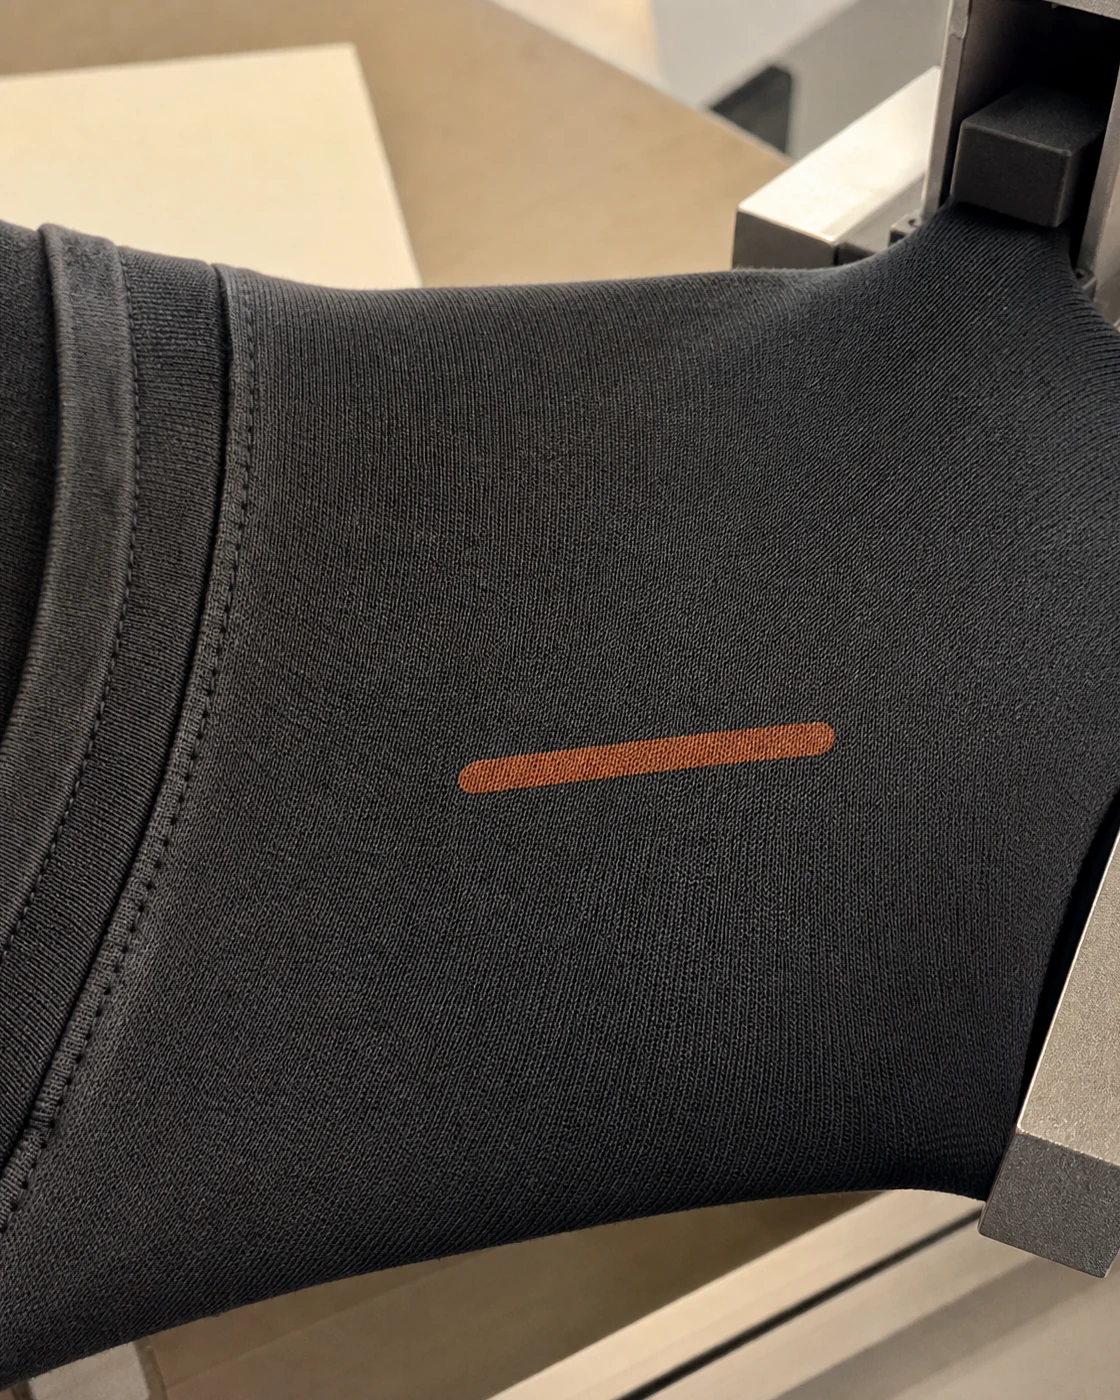
CHECK THE PROJECT
Check the Project First
The first sample depends on the garment, fabric finish, stretch direction and surface target—not the technique name alone.
A compatible product may exist for a difficult fabric. That is a reason to test, not a reason to skip testing.
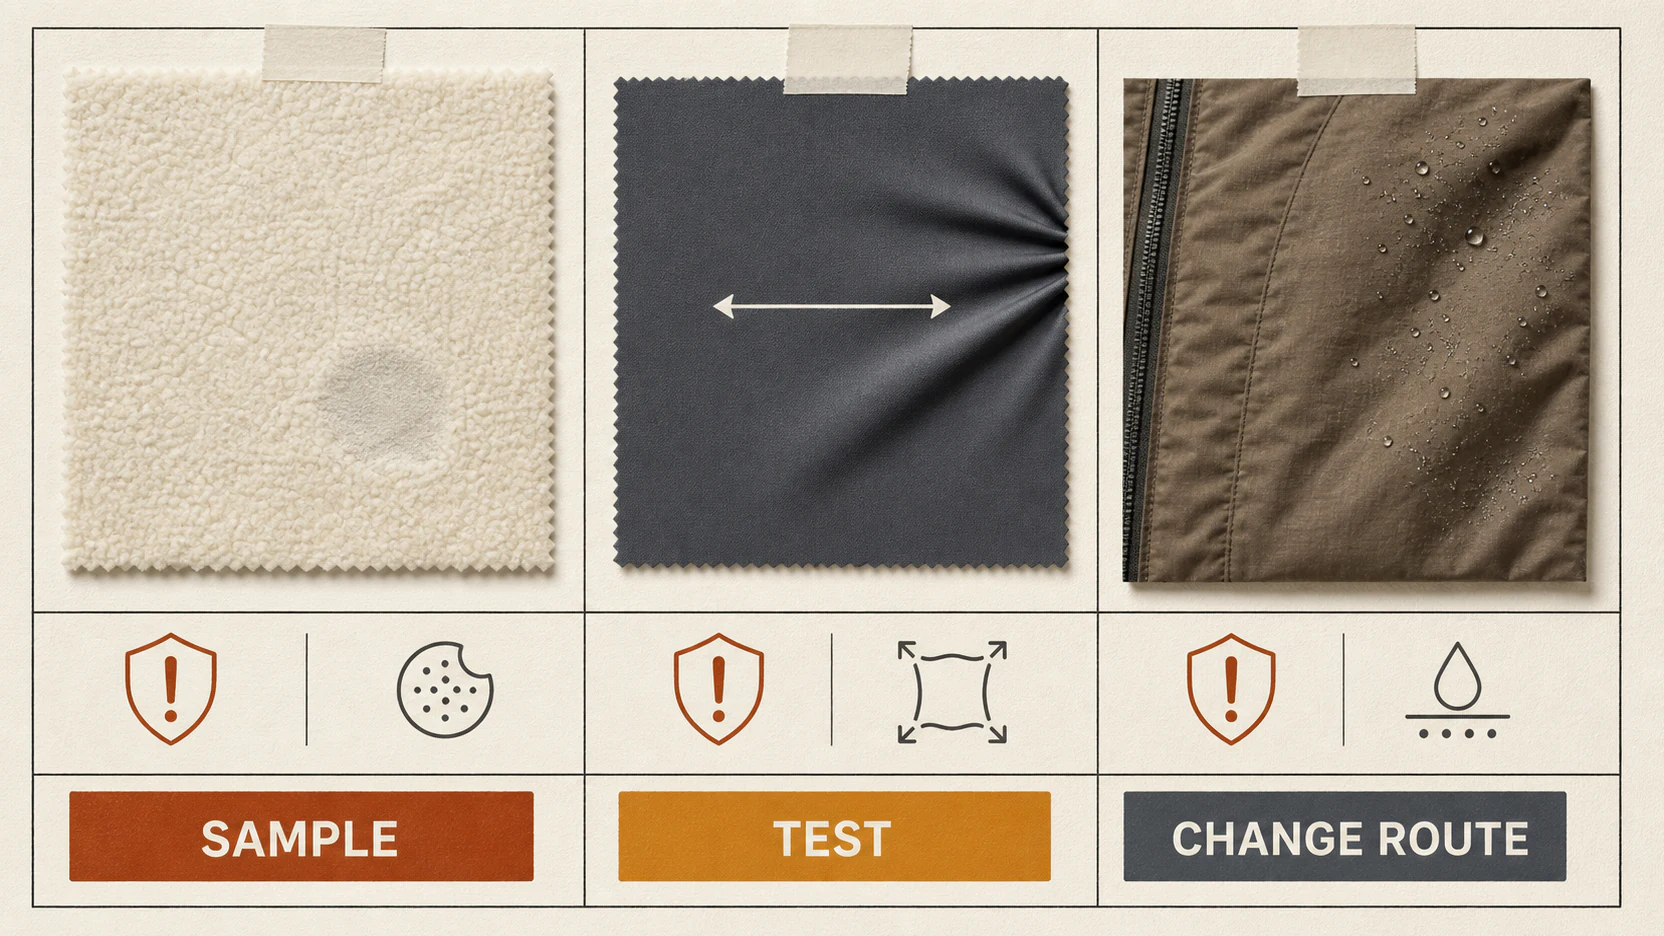
Good first samples
A local logo on stable cotton fleece, a small mark on cotton jersey or an elastic logo on a known stretch polyester.
Test the exact fabric
Dark or sublimated polyester, stretch jersey, brushed surfaces, nylon, DWR, coated and antimicrobial fabrics.
Change the route
Large thick solids on light fabric, artwork crossing hardware, velvet-touch requests, photographic graphics or a pre-made emblem brief.
pieces per style per colour. Material or a specific style may require another minimum.
NAME THE SYSTEM
Four Names. Four Decisions.
Quote the material and route together. Direct silicone, matte, low build is useful; rubber logo is not yet a production specification.
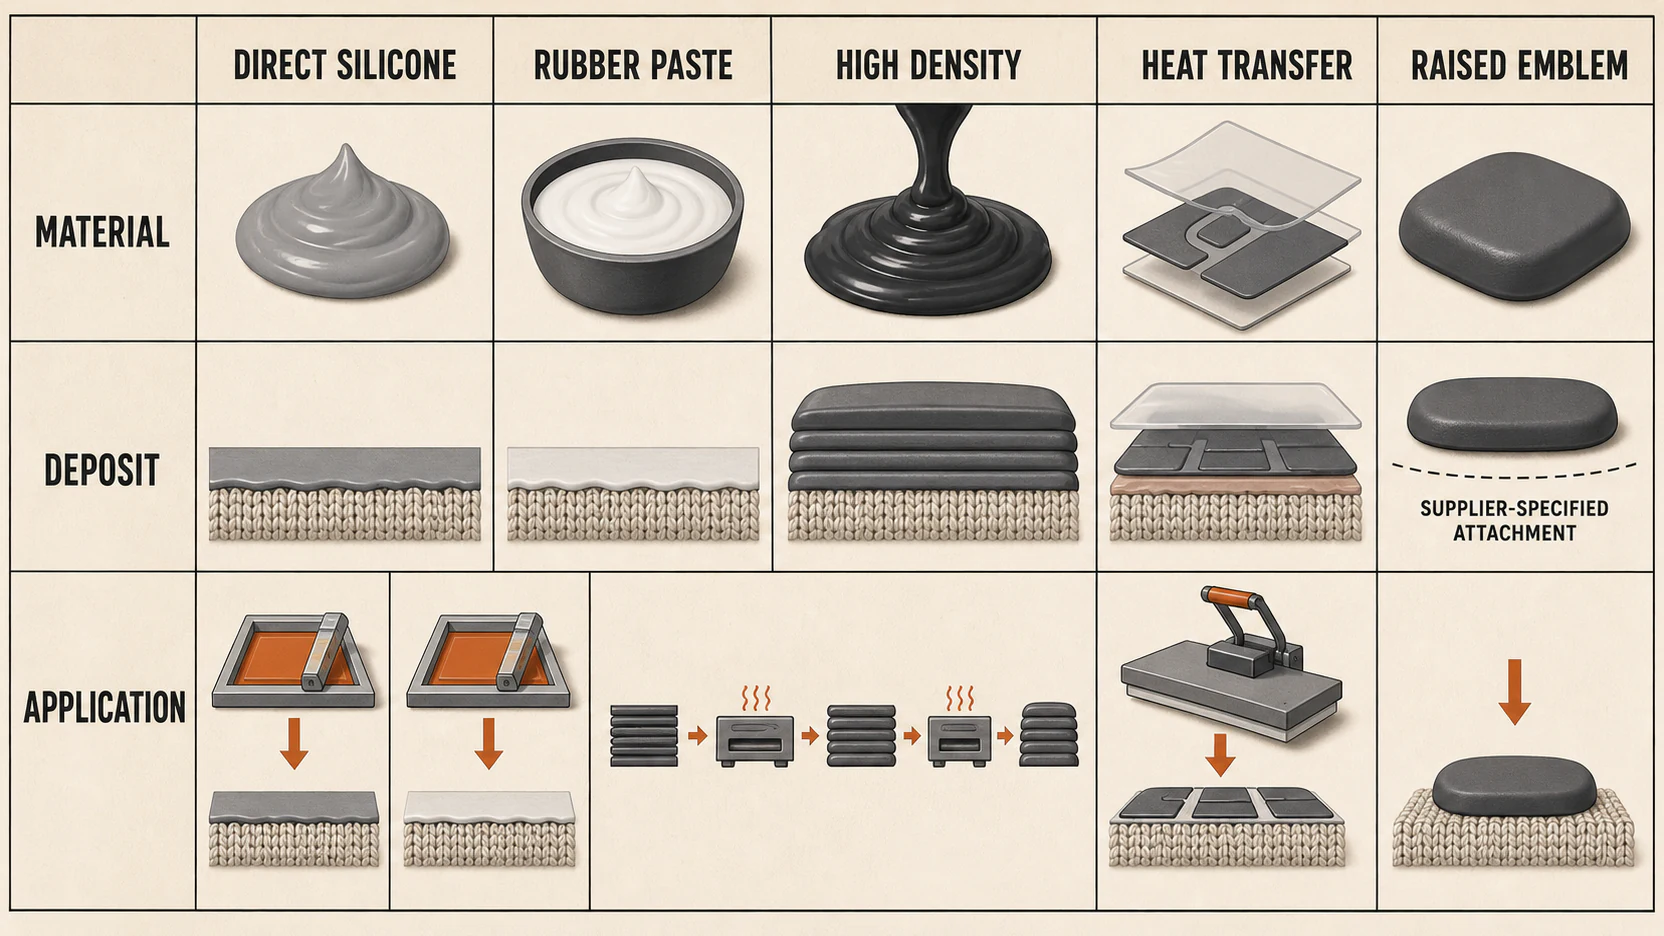
Silicone ink
A silicone-elastomer material family; many products use a catalyst or A/B components and cure after direct screen printing.
Material familyRubber ink
A supplier term often used for an elastic water-based paste. Confirm the exact binder and TDS.
Supplier termHigh density
A built-up deposit created through screen construction, ink flow and repeated print or flash steps; it is not one material.
Deposit geometrySeparate silicone component
Keep an S08 screen-print heat transfer separate from an S09 raised emblem whose attachment route remains supplier-specific.
Separate componentAPPROVE THE MOVEMENT
Stretch Is Only Half the Test
Raw-material elongation data is not a garment guarantee. Approve the printed fabric, print geometry and build together.
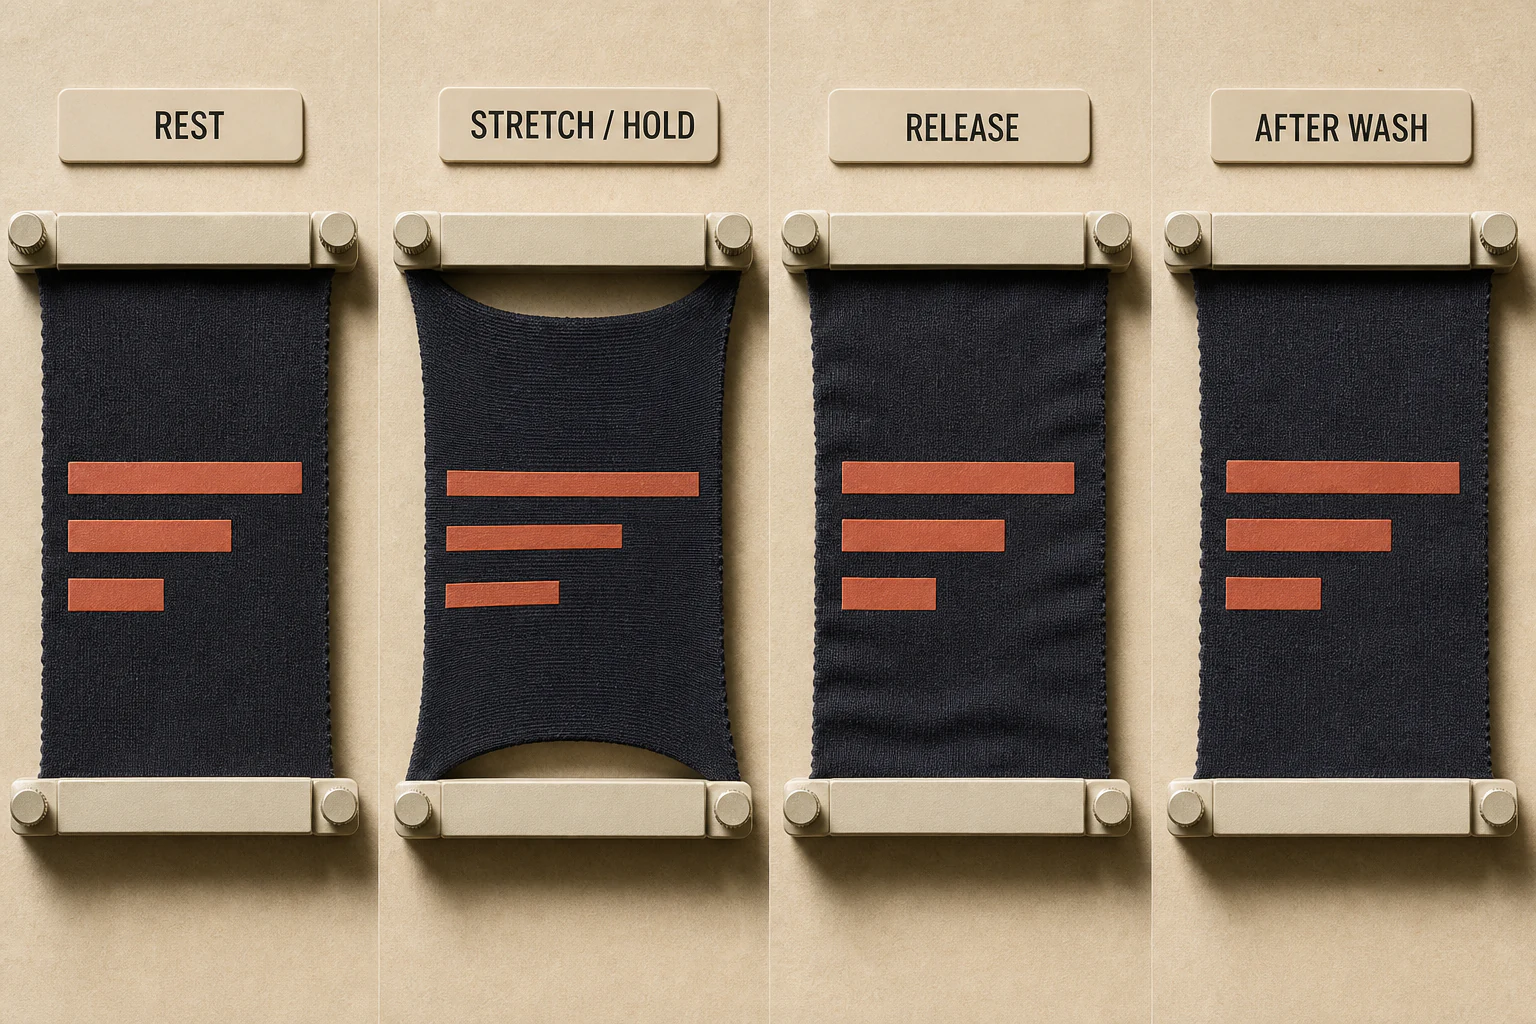
- 01
Rest
Record the original edge, colour and dimensions and reject initial tack, curl or visible distortion.
- 02
Stretch and hold
Extend in the garment's real direction and check cracking, whitening, layer split and edge lift.
- 03
Release
Check whether the graphic and base fabric return without permanent waves or visible deformation.
- 04
Wash and repeat
Repeat the same controlled observation after the agreed care procedure.
READ THE CROSS-SECTION
How the Build Is Made
Layer count alone does not define thickness. Mesh, stencil, rheology, strokes, flash, underbase, fabric absorption and final cure all change the result.
Flat, low build, raised build and separate emblem are project directions, not universal millimetre grades.
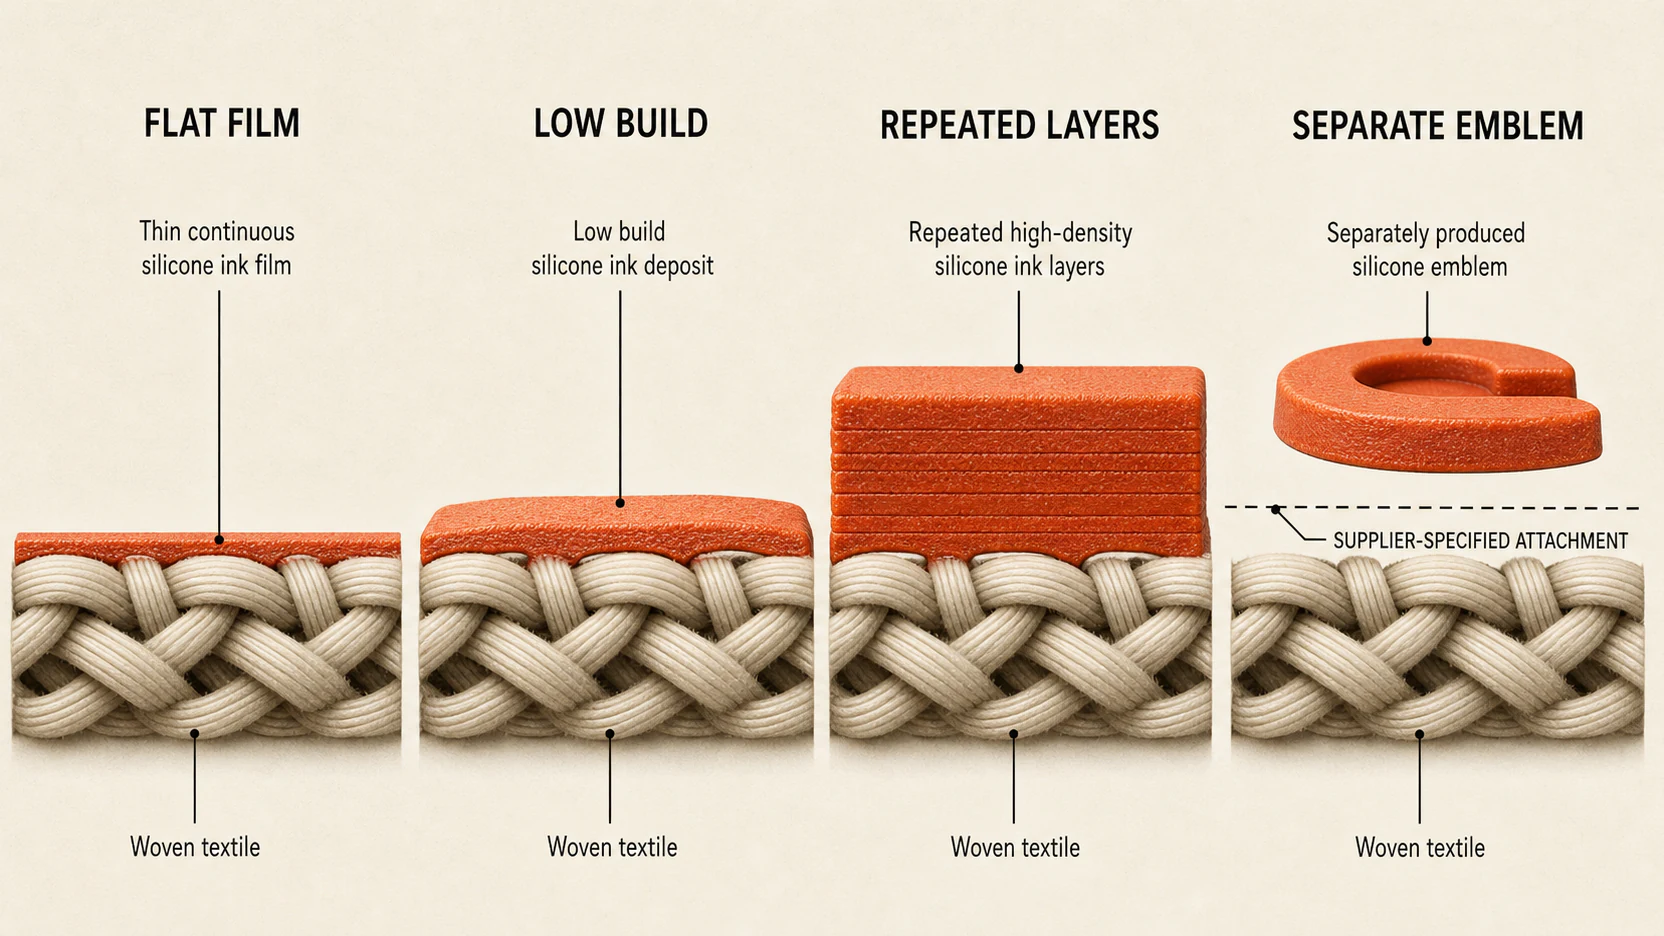
Flat colour film
A direct surface film where colour, hand, cure and fabric interaction are approved together.
Low built deposit
A controlled deposit with some visual depth but no invented universal thickness.
Repeated high-density layers
A direct build produced through route-specific screen, flow, deposit, flash and cure controls.
Separate raised emblem
A separately produced component shown with supplier-specified attachment until the actual product route is confirmed.
TEST THE SUBSTRATE
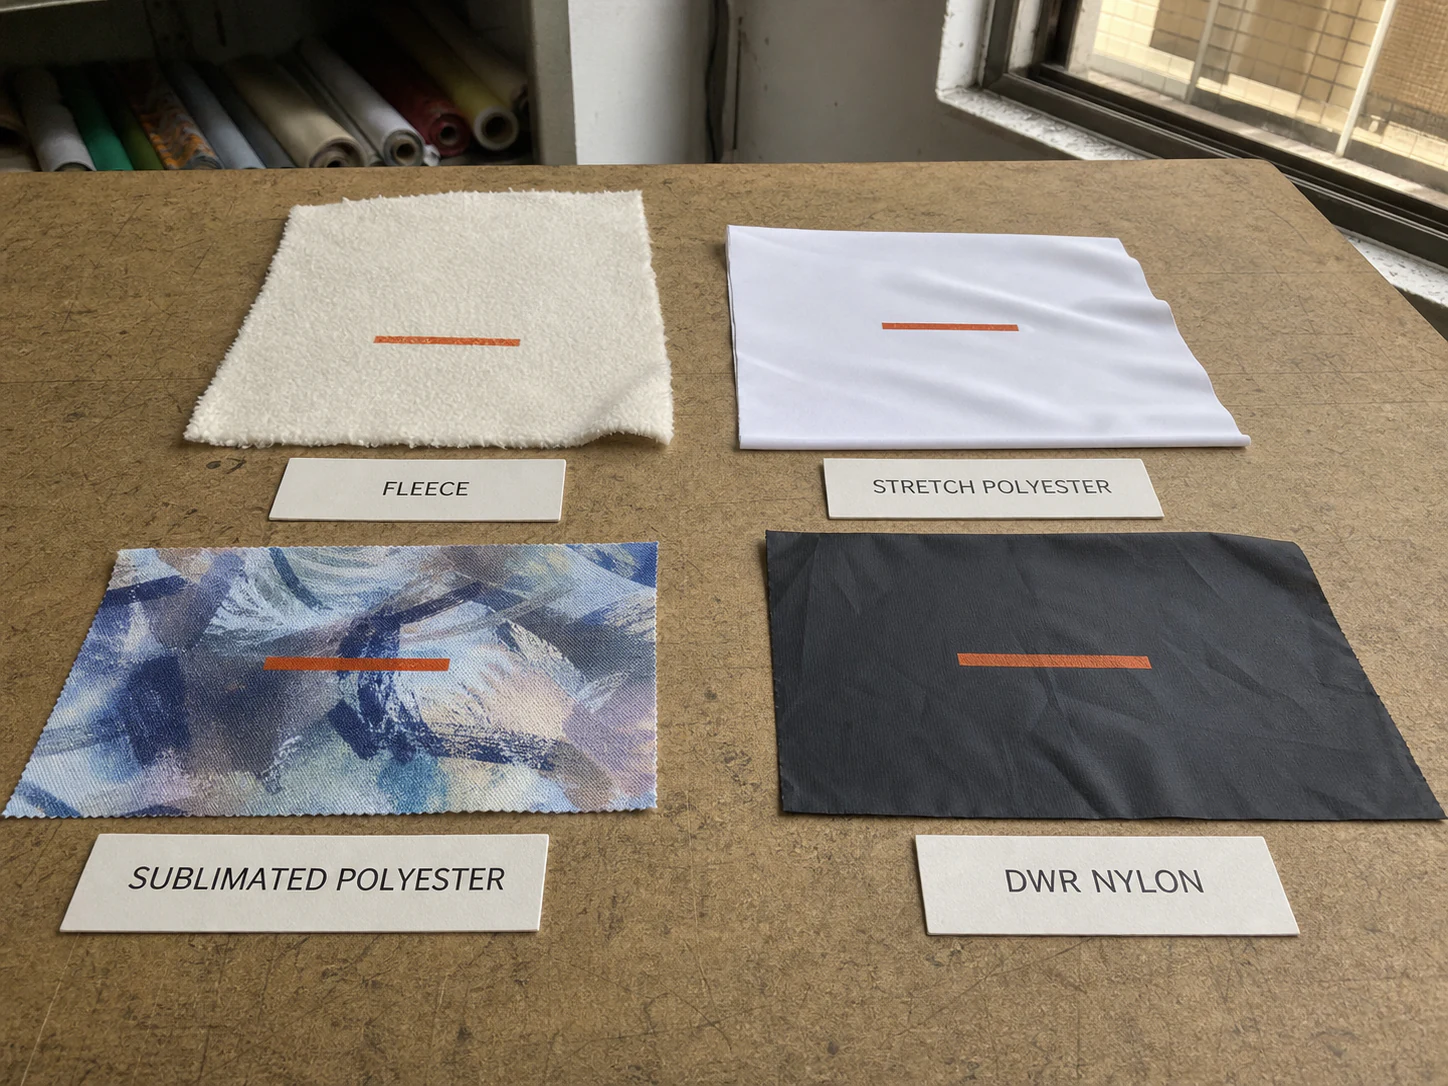
Read the Fabric Finish
Fibre content is only the start. Surface finish, dye route, stretch direction and garment construction can decide whether the ink cures and bonds.
Cotton fleece and jersey
Check brushing, absorption, base colour, weight, drape and the hand of any large solid.
Stretch polyester
Check exact colour, sublimation route, finish and the real garment stretch direction.
Nylon, DWR or coated panels
Confirm the compatible product, adhesion, cure and heat response before quotation lock.
Light drapey polyester
Keep the mark local and light, then approve drape, show-through and any press mark.
ENGINEER THE ARTWORK
Design for the Ink Film
The same vector file may need separate artwork for flat colour, raised build and transfer production.
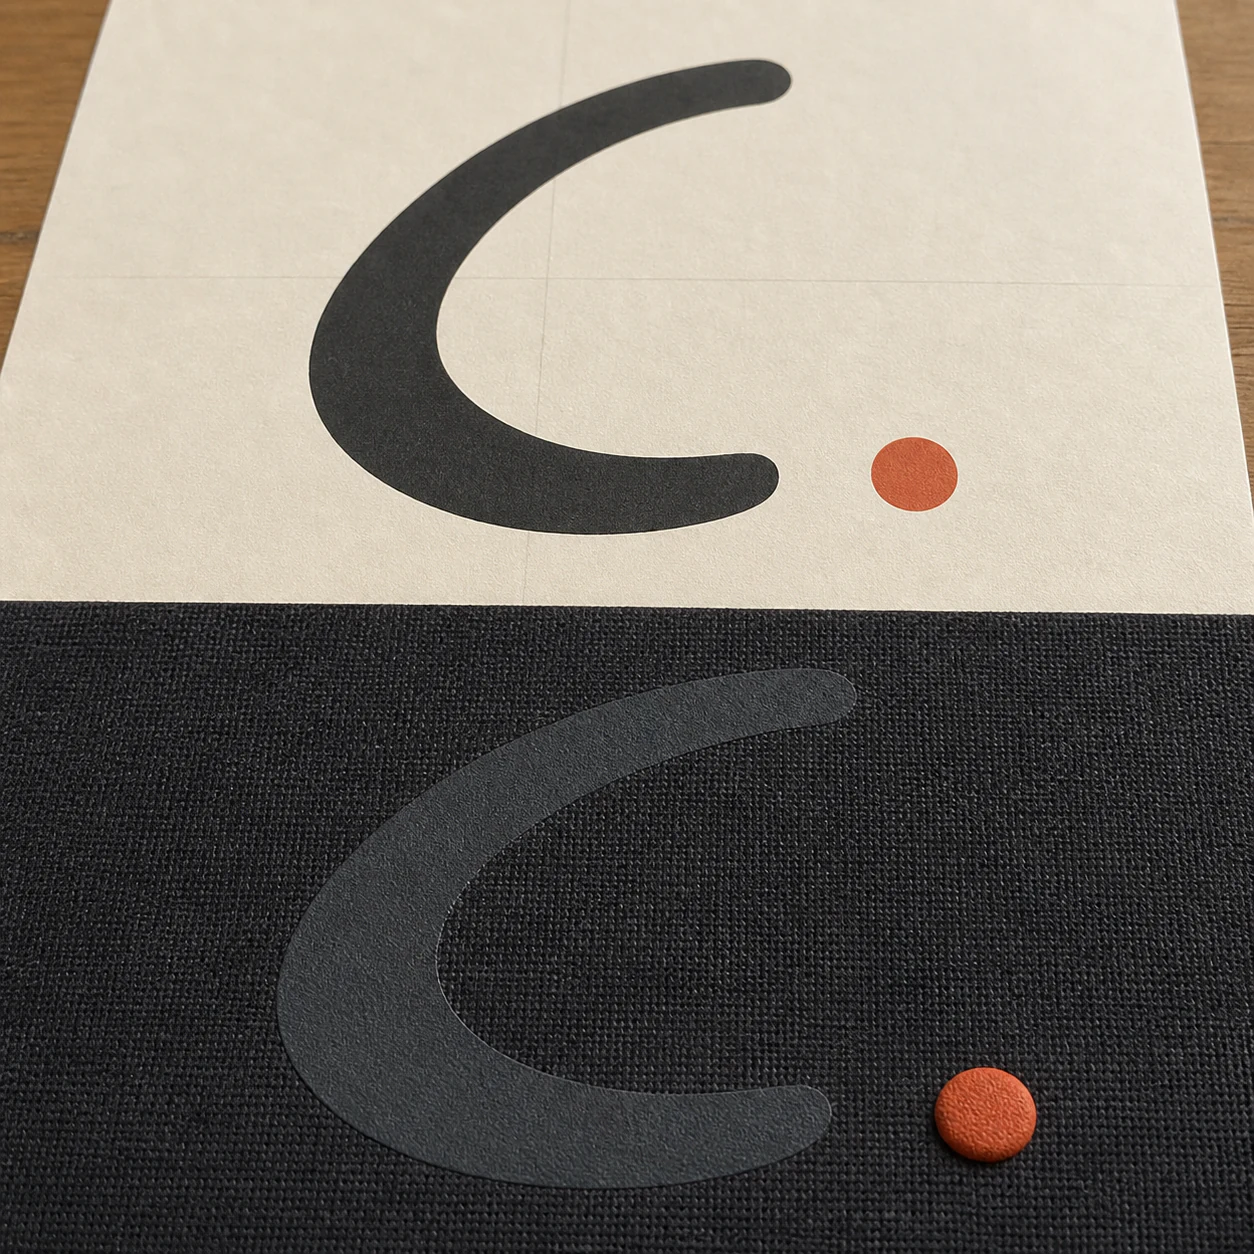
Works well
Bold local logos, open negative space, selected surface accents and placement on a flat garment panel.
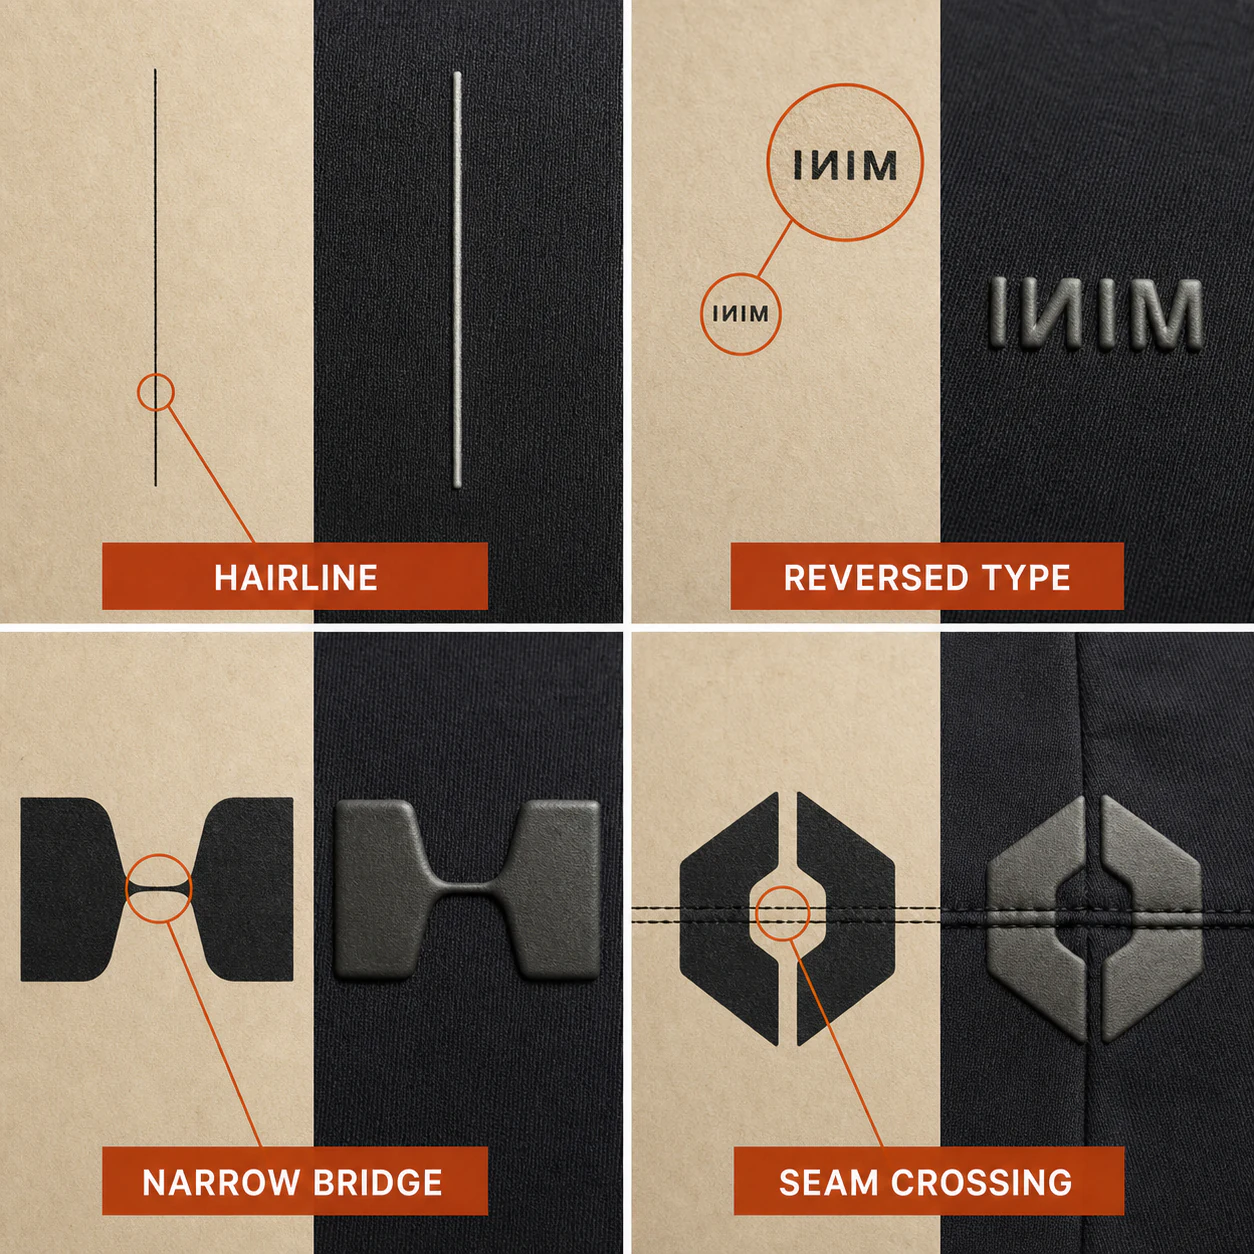
Revise before sampling
Hairlines, tiny reversed text, narrow bridges across maximum stretch, large solids on light fabric and artwork crossing seams or zips.
CONTROL THE CLOCK
The Catalyst Starts the Clock
Catalyst percentages and A/B ratios are product-specific. One supplier's recipe is not an industry recipe.
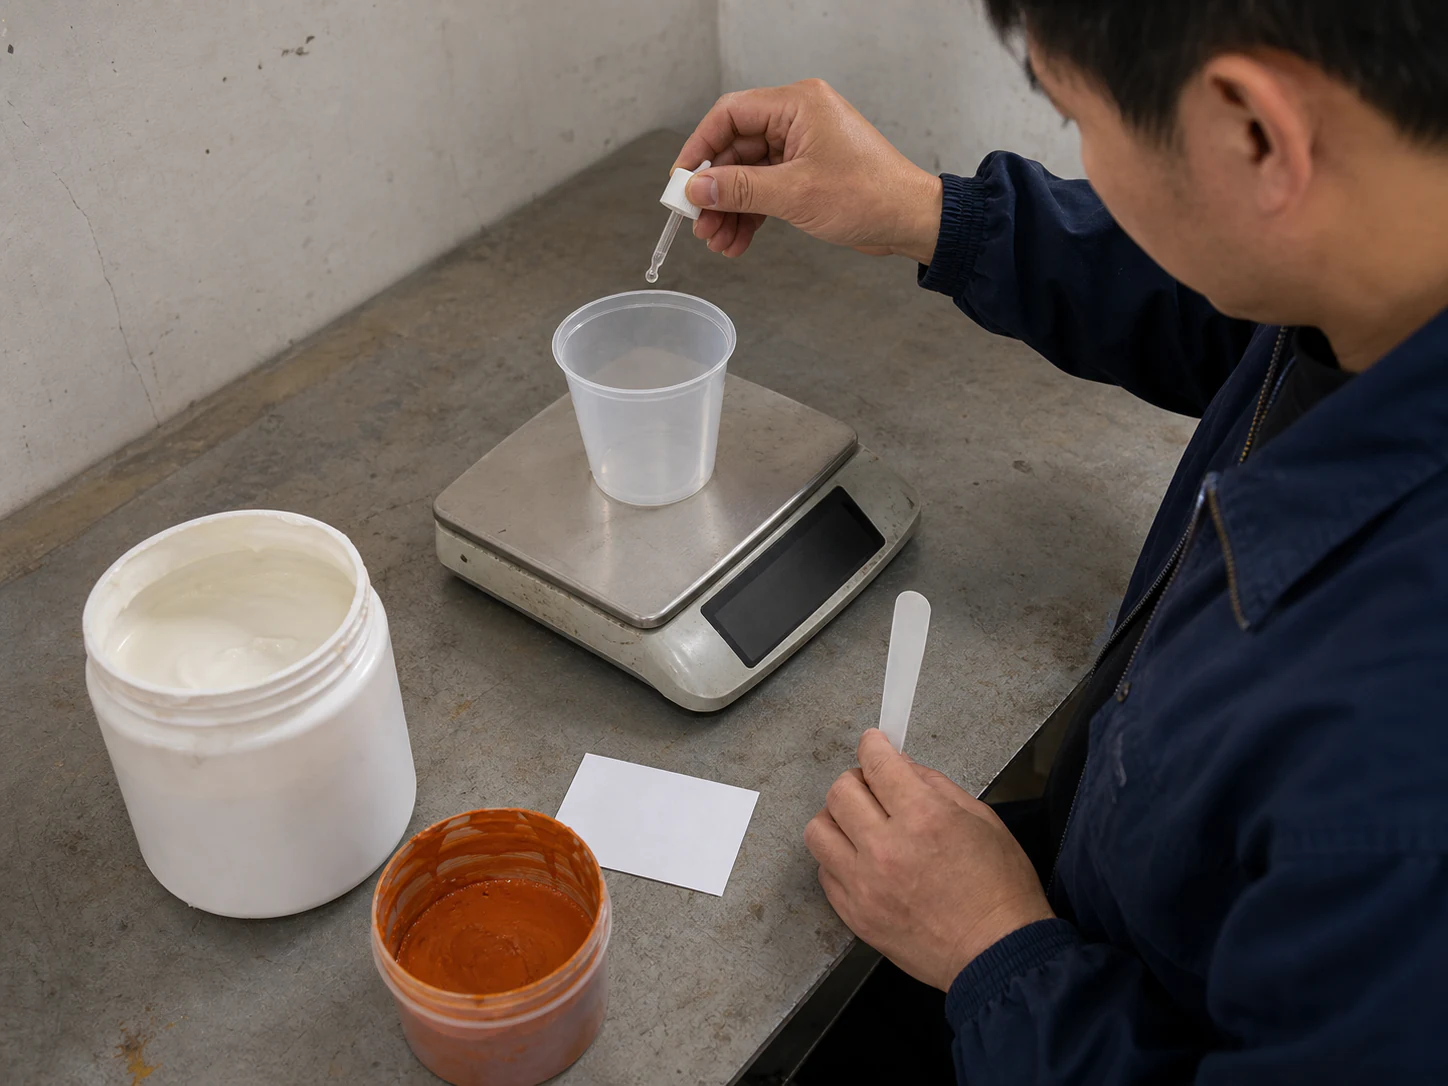
- 01
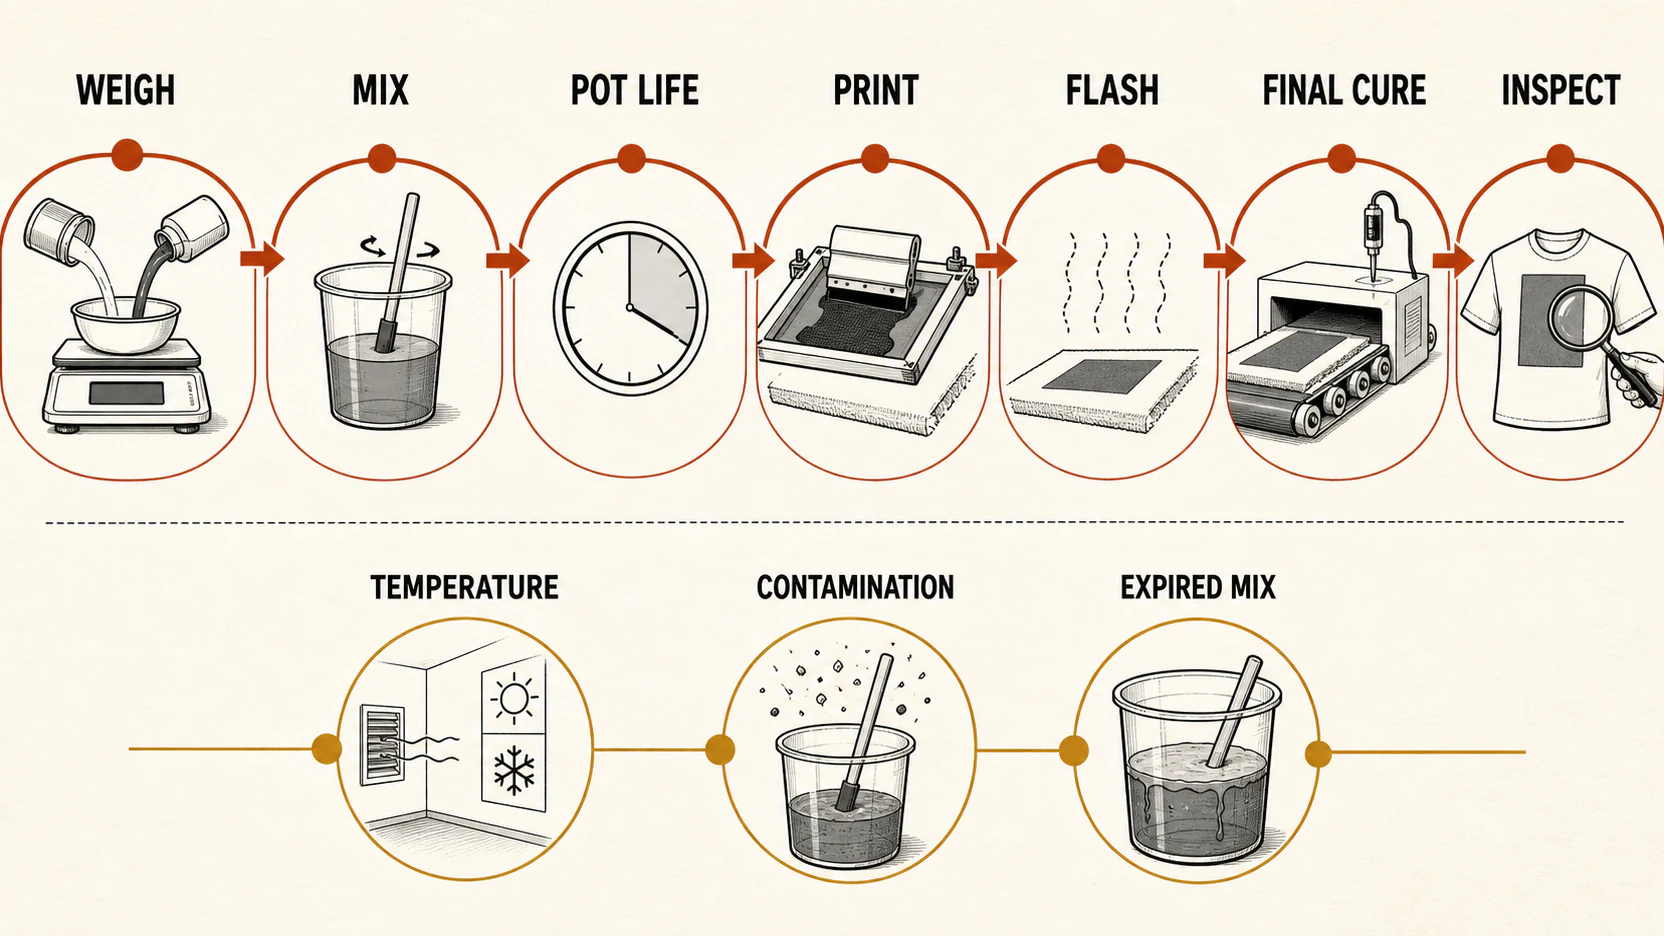
Identify and weigh
Lock the exact base, pigment, catalyst or Part B, barrier and retarder, then measure the approved formulation by weight.
- 02
Mix and time
Add the catalyst at the specified stage and label the mix time, batch and usable window.
- 03
Print and flash
Build only after each layer reaches the intermediate state required by the selected TDS.
- 04
Cure and record
Verify the print-film temperature and final sample instead of relying only on the oven setting.
STOP A FAILED CURE
When Silicone Will Not Cure
A sticky print is not a cosmetic variation. Stop the run and isolate the cure cause.
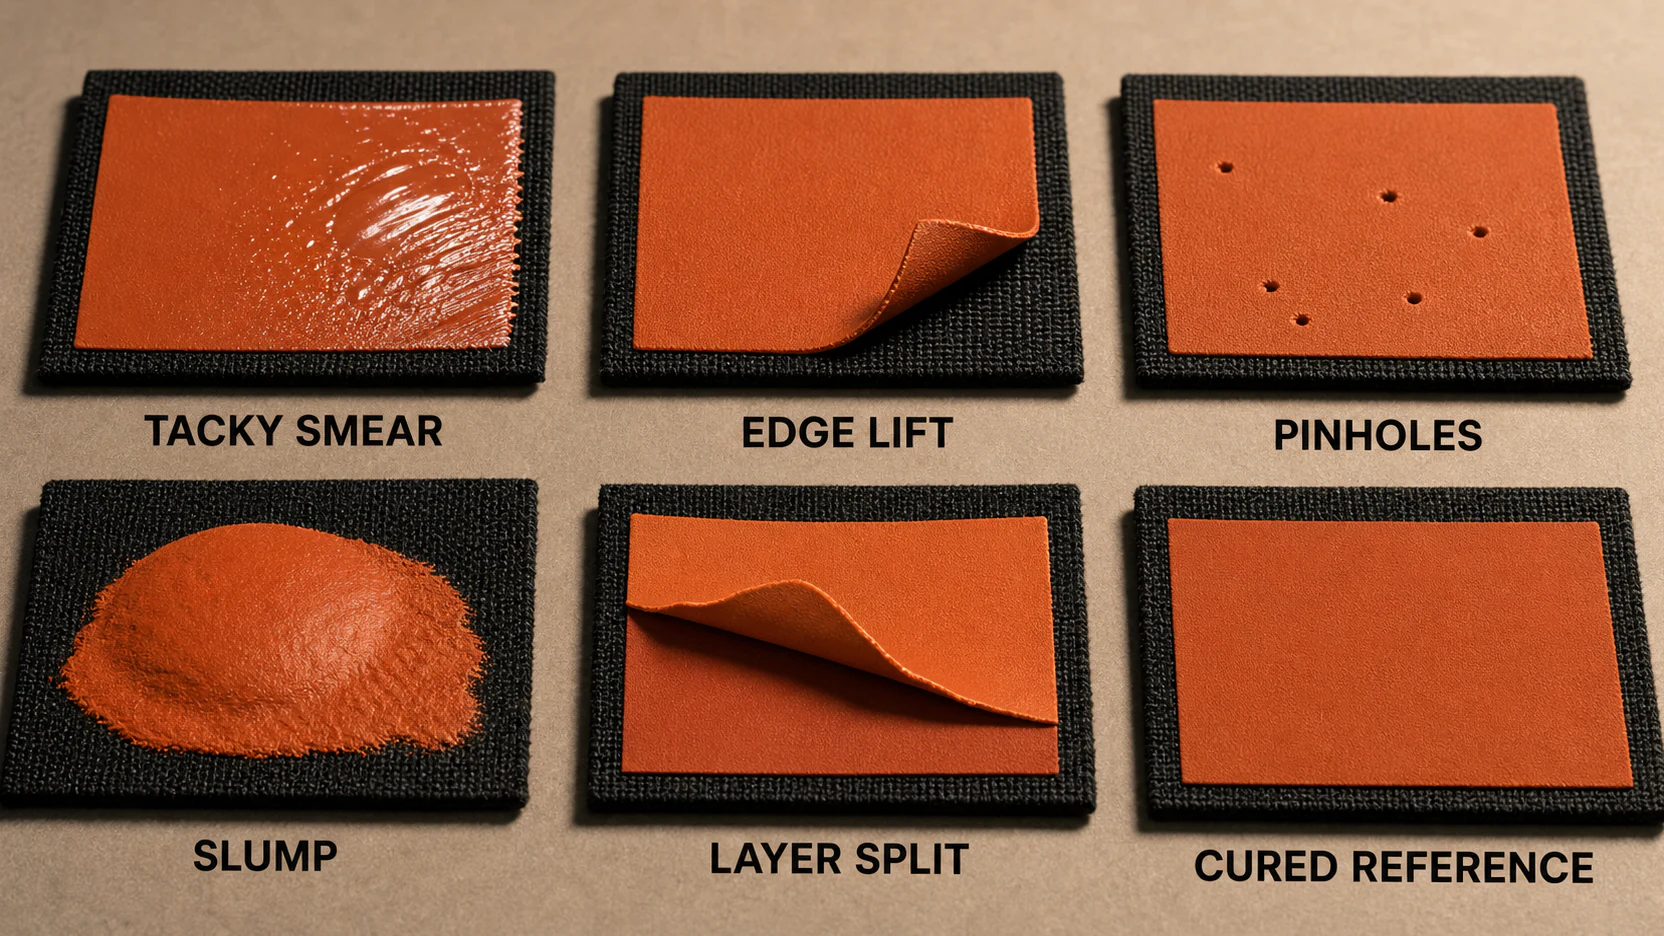
Tacky after cooling
Check the exact mix, usable window, fabric finish and measured film temperature.
Local soft spots
Check contamination, pallet condition and uneven heating.
Edge peel or layer split
Check substrate compatibility, underbase, flash state, cleanliness and final cure.
Pinholes or slumped edges
Check trapped air, rheology, stencil, stroke and the stability of each deposited layer.
CONTROL THE DYE
Stop Dye Before It Moves
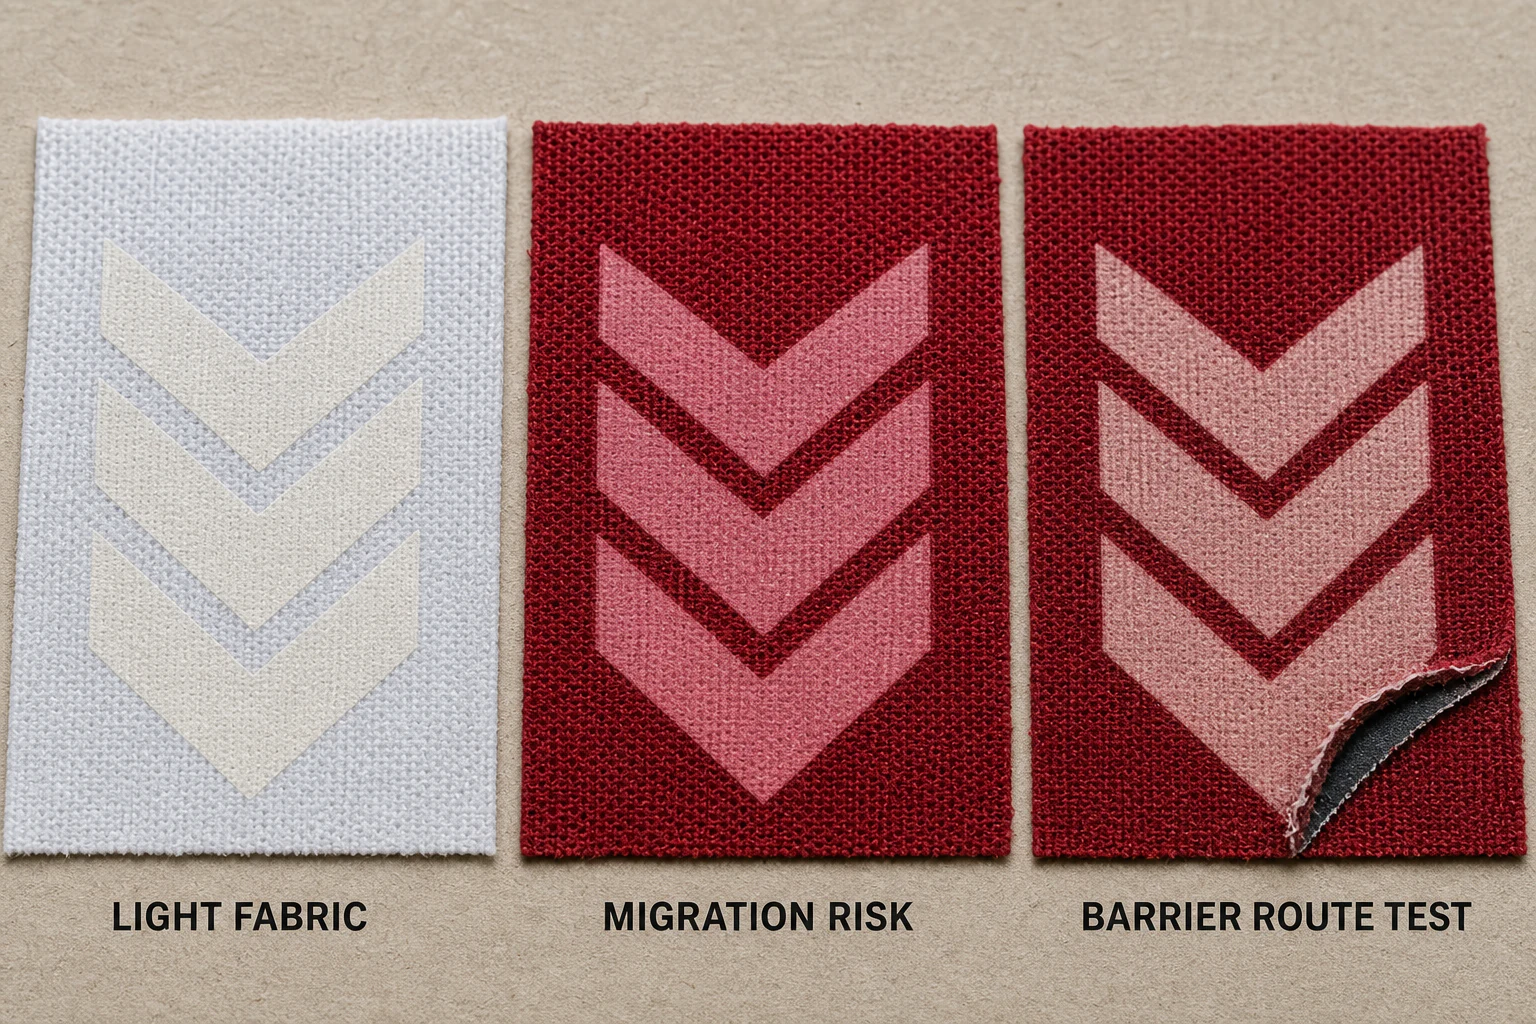
Dark and sublimated polyester add a second problem: the ink must cure while the garment dye stays under control.
A barrier is a test route, not a universal guarantee.
- 01
Identify
Record whether the fabric is piece-dyed, sublimated or unknown.
- 02
Select and test
Compare an appropriate barrier, low-temperature route or named silicone transfer on the actual fabric.
- 03
Inspect
Review shade movement, glazing, distortion and press marks immediately and after the agreed ageing or care condition.
SIGN THE PHYSICAL RESULT
Approve the Physical Sample
Wash tested is incomplete without the procedure, cycle count, drying method and pass criteria.
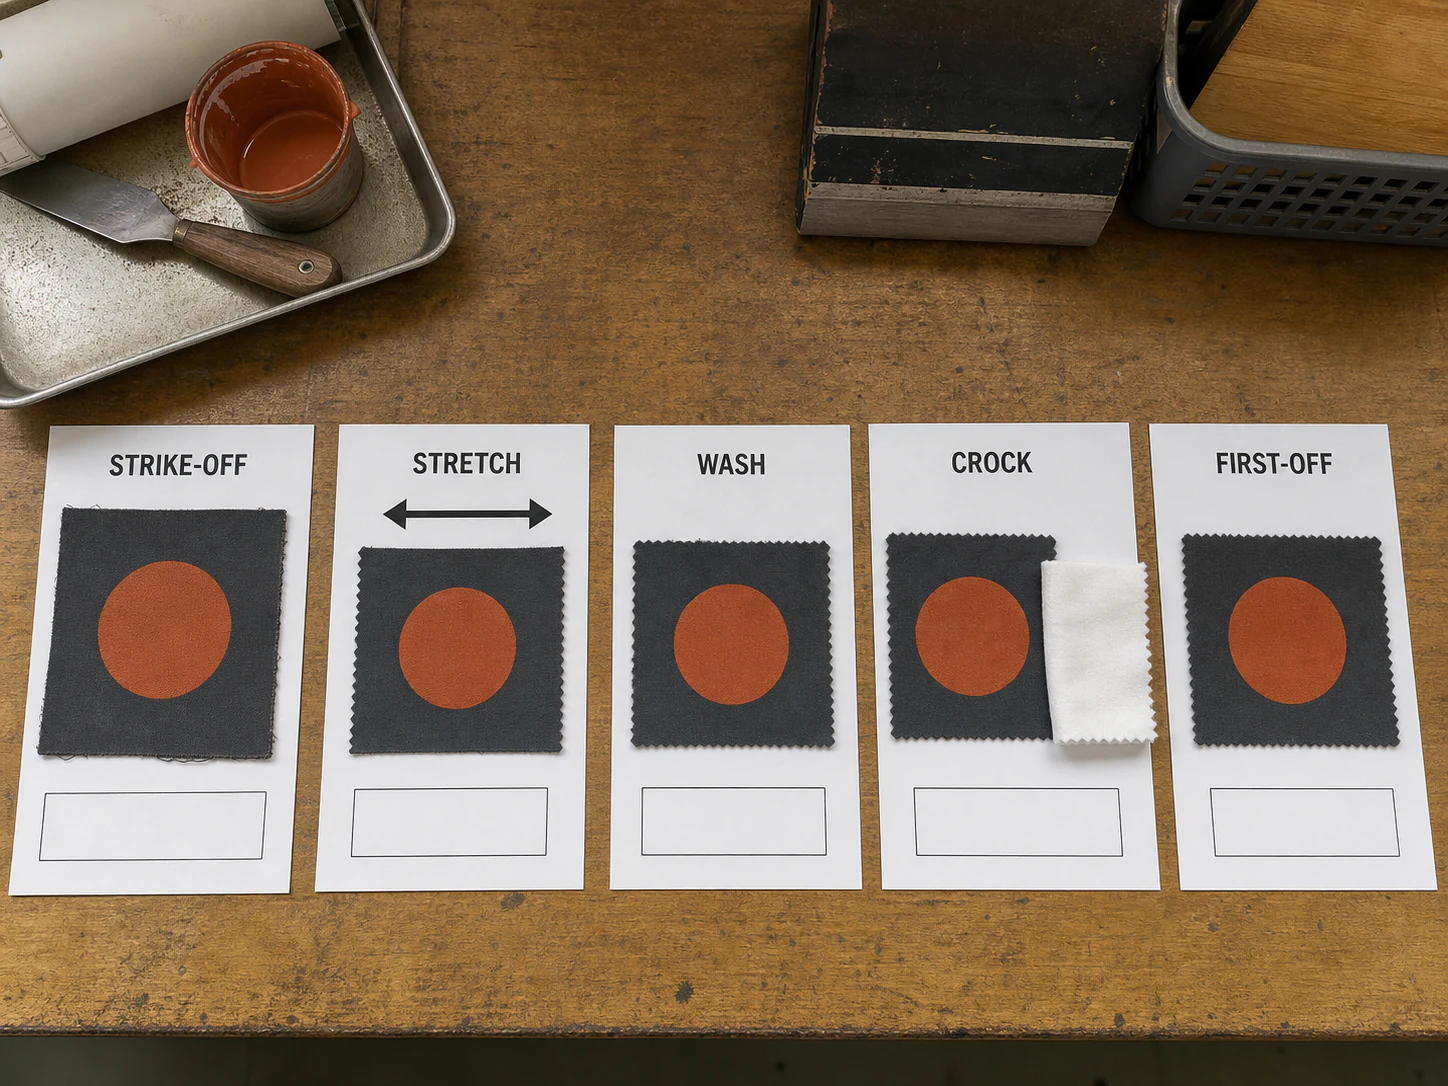
- 01
Material identity
Record the exact system, current TDS and any product-specific RSL or MRSL requirement.
- 02
Fabric compatibility
Lock the fabric, colour, dye route, finish, stretch direction and adhesion or cure screen.
- 03
Visual strike-off
Approve colour, opacity, gloss, build, edge and hand on the production substrate.
- 04
Performance sample
Run the agreed stretch, wash, rub, migration and adhesion observations with visible acceptance criteria.
- 05
Bulk first-off
Compare first, middle and last pieces with the signed sample for surface, edge, tack, build and placement.
COMPARE THE SURFACE SOURCE
Compare the Surface Source
Silicone, Puff and Flock can all look dimensional, but deposited elastomer, heat-expanded foam and adhesive-held fibres are different constructions.
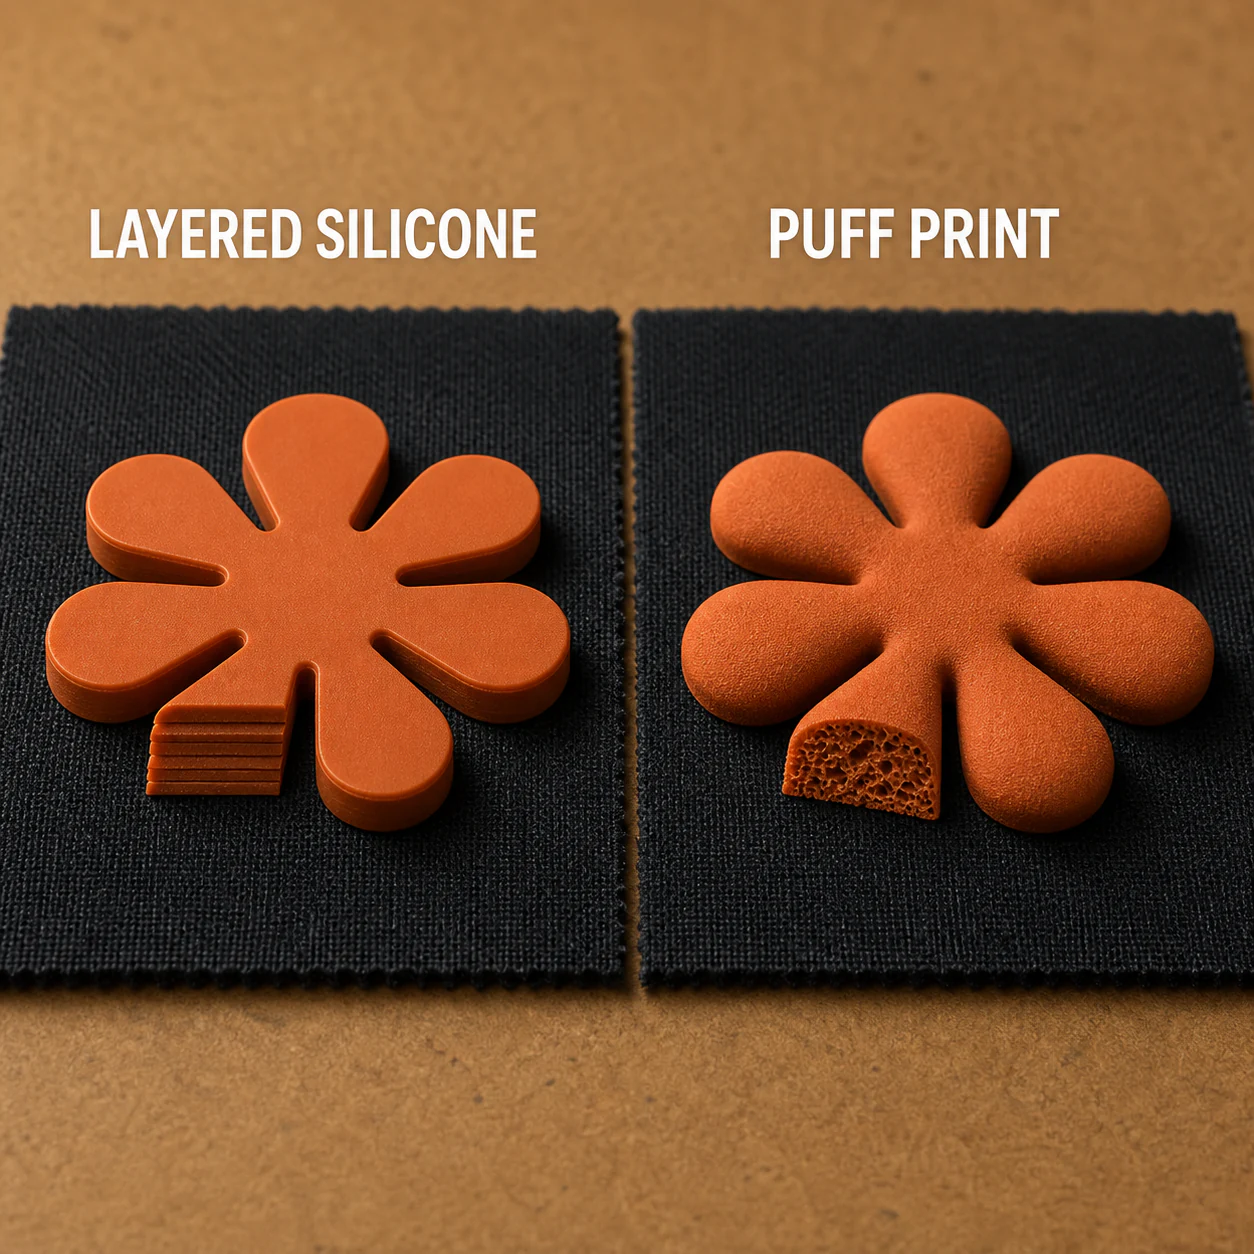
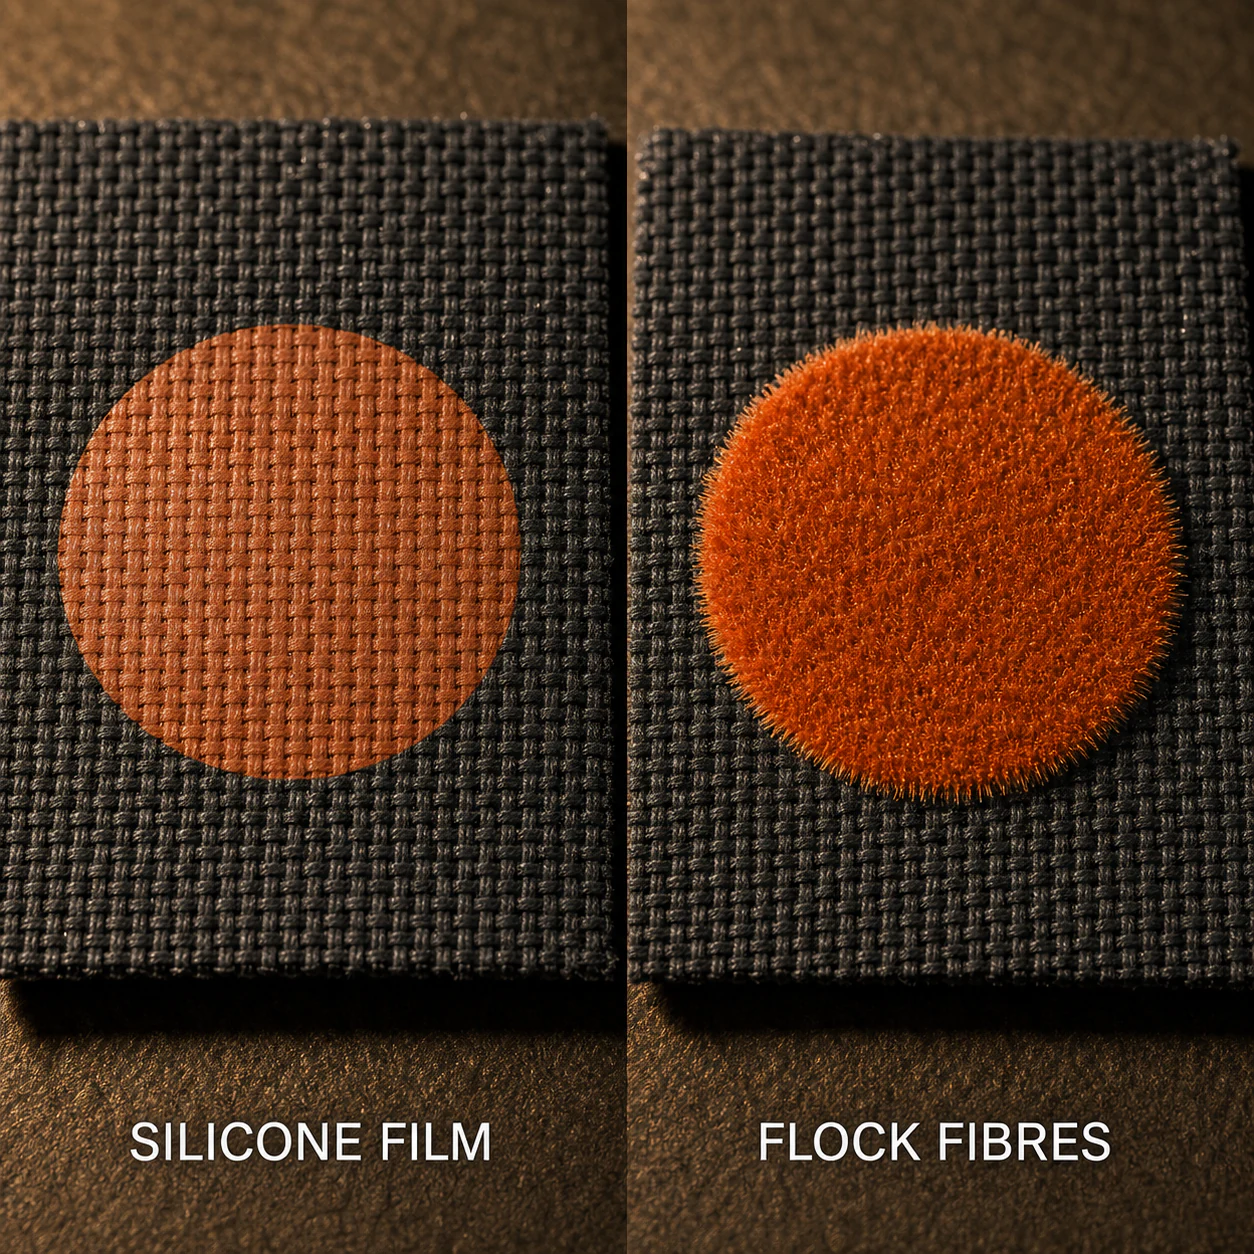
Direct silicone
A cured elastic ink film; first ask whether the project needs stretch and recovery on the selected fabric.
Rubber paste
A supplier-specific elastic binder film; first ask for the exact binder and TDS.
Puff
A heat-expanded raised surface; select it for the intended foam character, not an assumed stretch ranking.
Flock
An adhesive-held fibre surface; select it for a velvet-like pile, not an assumed stretch ranking.
Screen Printing
A printing method that still requires the correct ink family and production setup.
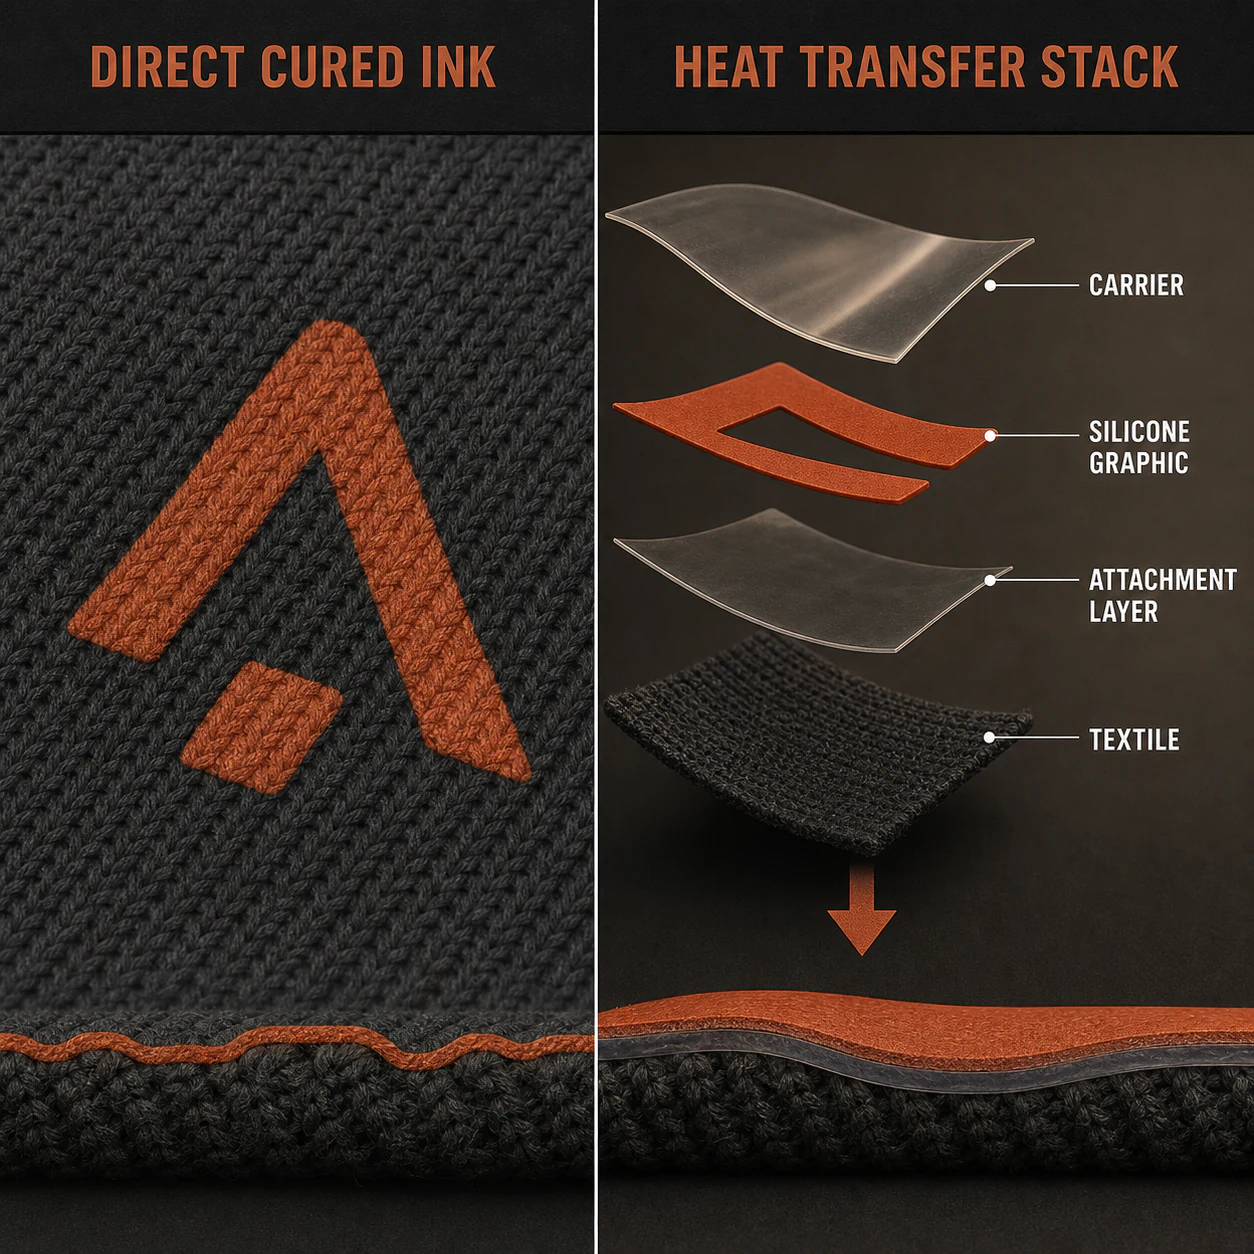
Screen-print silicone heat transfer
A prepared transfer route with product-specific press, peel, edge and heat-response controls.
Printed raised-silicone emblem
A separately produced dimensional component approved for detail, surface, height, position and supplier-confirmed attachment.
PRICE THE REAL ROUTE
What Changes the Route
The quote changes with the direct, transfer or emblem route; ink family; colours; size; build; underbase; fabric; artwork; sampling and test plan.
No universal price difference, thickness, hardness, wash count or lead time is inferred from the technique name.
Useful options
Elastic, matte, gloss, gel, controlled raised, direct-print, defined transfer and separately produced emblem directions.
Production limits
The exact system, finish, catalyst clock, deposit, migration risk and physical approval cannot be skipped.
Quote inputs
Route, ink family, colours, finished size, placements, target build, fabric and finish, artwork, quantity, care and market requirements.
SAMPLE THE REAL PLACEMENT
Where It Can Be Sampled
These are sample directions. Suitability depends on the fabric, finish, structure, artwork, quantity and approved test result.
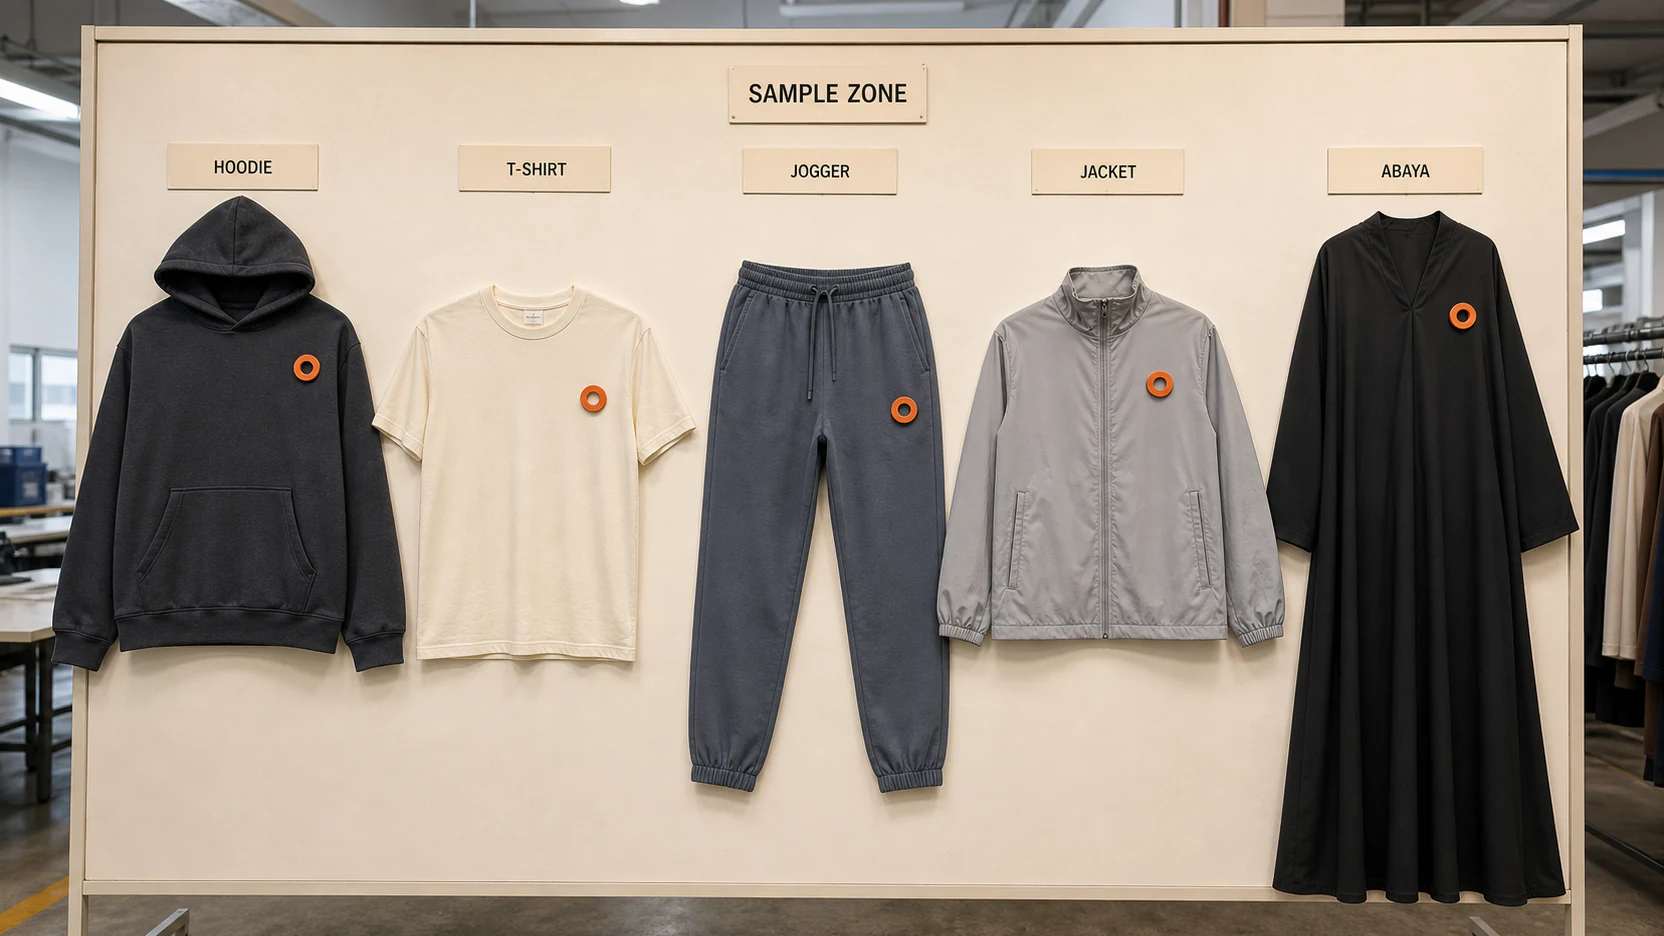
Hoodies
Test matte, opaque or controlled raised logos on the exact fleece, colour and placement.
Hoodies→T-Shirts
Keep the build compatible with jersey weight, drape and printed area.
T-Shirts→Joggers
Check stretch, friction and recovery at the real thigh or leg placement.
Joggers→Jackets
Confirm nylon, coating, DWR and heat sensitivity before choosing direct print or transfer.
Jackets→Abaya
Use a light local branding direction and protect the drape of the exact fabric.
Abaya→BUYER QUESTIONS
Silicone Printing FAQ
Each answer stays tied to the selected material, garment and physical sample.
01Is silicone ink the same as rubber ink?+
No. Silicone names an elastomer family; rubber ink is a broader supplier term. Ask for the exact binder and TDS.
02Is all silicone printing high density?+
No. Silicone systems can produce flat colour, clear or gloss gel, opaque surfaces and built-up effects.
03How thick can the print be?+
There is no responsible universal number. Approve a strike-off and record the actual screen, deposit, flash, fabric and cure route.
04Can it stretch with activewear?+
Specific systems target high elongation, but the production fabric, geometry, build, cure and direction must be tested together.
05Can silicone print on polyester?+
Named systems, barriers and transfers exist, but dark or sublimated polyester adds migration risk that must be tested.
06What about nylon or DWR jackets?+
Use only a confirmed compatible system and test cure, adhesion and heat response on the exact finish.
07Does silicone ink need a catalyst?+
Many textile systems do, but the percentage or A/B structure varies by product. Follow the current TDS.
08Why is a silicone print still tacky?+
Check ratio, usable life, measured film temperature, contamination and fabric finish before production continues.
09Is water-based rubber ink automatically safer?+
No. Water-based does not establish full chemical compliance. Review the selected product's SDS and order-specific requirements.
10Is all silicone printing PVC-free?+
No page-level claim is made. Bind any PVC or phthalate statement to the selected product's current document.
11Direct print, heat transfer or raised emblem?+
Direct ink cures on the garment. S08 transfer is heat-and-pressure applied; the S09 emblem is separate and needs supplier-confirmed attachment.
12What artwork should I send?+
Send editable vector art, final size, colour target, placement, fabric and finish, stretch direction, surface target and quantity.
13What is your usual MOQ?+
Usually 100 pieces per style per colour. Material or a specific style may require a different minimum.
14How should wash durability be approved?+
Define the procedure, cycles, drying method and acceptance criteria, then test the approved production-fabric sample.
15Can the print cross a seam or zip?+
That is a higher-risk placement. Move it to a stable panel or test a purpose-made route on the real construction.
SEND THE REAL SPECIFICATION
Send the Real Specification
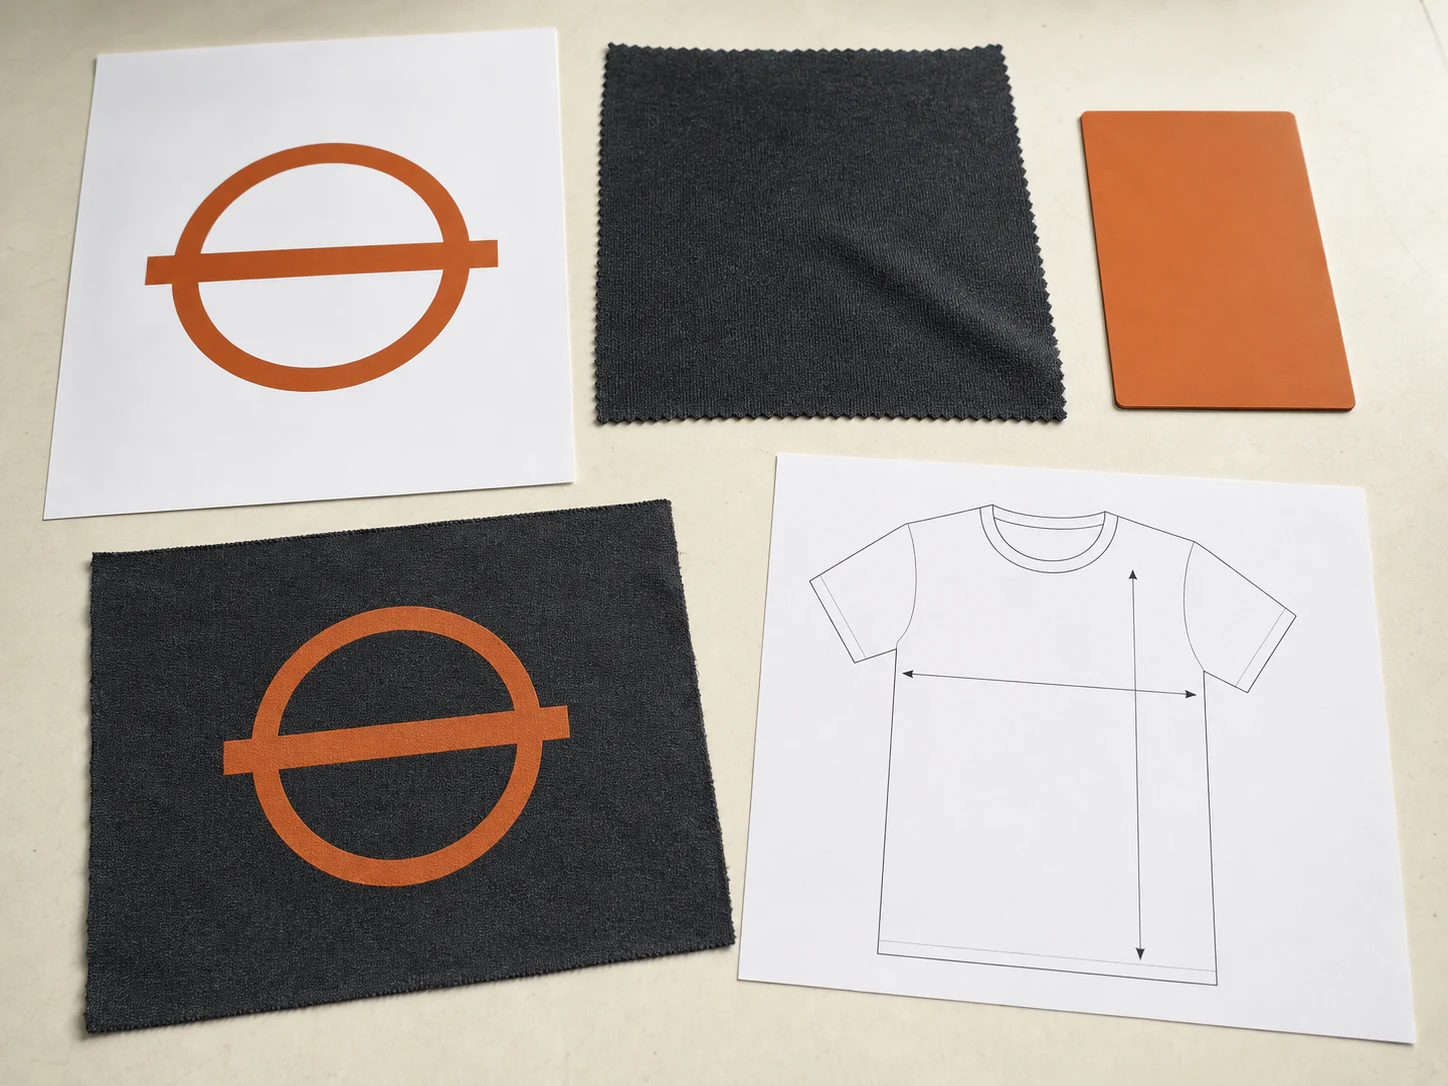
Share the artwork, exact fabric and surface target. We will identify whether the project needs direct silicone, a verified rubber-paste system, a built-up print, a screen-print heat transfer or a separately produced raised-silicone emblem.
The emblem attachment route is confirmed separately.
- 01
Required
Contact, company, garment, quantity, artwork, size, placement, fabric, colour, stretch, surface, route and destination market.
- 02
Helpful
GSM, finish, Pantone, care, RSL or MRSL requirement, physical reference and project notes.
- 03
Submission boundary
Submitting a brief starts a manufacturing review; it does not confirm production, fabric compatibility or a final process.
Silicone printing inquiry
Send the real garment and surface target.
We review the route, artwork, fabric, build, stretch direction and quantity before sampling.
Talk on WhatsApp →